
In today’s digital age, capturing high-quality photos and videos has become easier than ever. With the advancements in smartphone technology, iPhones have become popular tools for photography and videography. However, sometimes it can be challenging to get the perfect shot without a camera monitor. This is where your MacBook can come in handy.
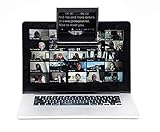
Using your MacBook as an iPhone camera monitor provides a larger and more detailed view of what your iPhone’s camera is capturing. Whether you are a professional photographer or simply enjoy capturing moments with your iPhone, this article will guide you through the steps of setting up your MacBook as a camera monitor for your iPhone.
Step 1: Connecting your iPhone and MacBook
The first step is to establish a connection between your iPhone and MacBook. Ensure that both devices are connected to the same Wi-Fi network. On your MacBook, launch the QuickTime Player application by searching for it in Spotlight or locating it in the Applications folder. Connect your iPhone to your MacBook using a lightning cable.
Note: Make sure you trust the MacBook on your iPhone by unlocking your iPhone and tapping “Trust” when prompted.

Step 2: Initiating the iPhone camera feed
Once your iPhone is connected to your MacBook, open the QuickTime Player application. In the menu bar at the top of the screen, click on “File” and then select “New Movie Recording.” A new window will appear with your MacBook’s built-in camera activated by default.
In this same window, next to the red record button, locate the dropdown menu that says “FaceTime HD Camera” and click on it. From the dropdown menu, select your connected iPhone as the video source. You should now see the live camera feed from your iPhone on your MacBook’s screen.
Step 3: Adjusting settings and capturing media
To ensure the best camera experience, you can adjust various settings on your MacBook. In the QuickTime Player window, you can use the slider to control the volume of the audio recorded from your iPhone. Additionally, you can click on the downward-facing arrow next to the record button to access settings such as resolution, quality, and orientation.
Once you have adjusted the settings according to your preference, you can start capturing photos and videos directly from your MacBook by clicking on the record button in the QuickTime Player window. This will allow you to easily frame and monitor your shots on the larger screen of your MacBook, giving you more control over the final result.
Using your MacBook as an iPhone camera monitor opens up new possibilities for capturing and creating stunning visual content. Whether you are a professional or an enthusiast, this method can greatly enhance your iPhone photography and videography skills. So, grab your MacBook, connect it to your iPhone, and start exploring the endless creative opportunities that await!
A Guide to Using a MacBook as an iPhone Camera Monitor
If you’re an iPhone user who loves photography or videography, you might be interested in finding a way to use your MacBook as a camera monitor. This can be helpful when you want to get a larger view of what your iPhone camera is capturing, especially for professional or artistic purposes. In this guide, we will walk you through the steps of using your MacBook as an iPhone camera monitor.
Requirements:
Before we begin, make sure you have the following requirements:
| MacBook: | An Apple MacBook with macOS High Sierra or later |
| iPhone: | An iPhone running iOS 8 or later |
| Lightning cable: | A Lightning to USB cable to connect your iPhone to MacBook |
Step-by-Step Guide:
Follow these steps to use your MacBook as an iPhone camera monitor:

- Connect your iPhone to your MacBook using a Lightning to USB cable.
- On your MacBook, open QuickTime Player. You can find it in the “Applications” folder or use Spotlight search to quickly locate it.
- In QuickTime Player, click on “File” in the menu bar and select “New Movie Recording”.
- A new window will open with the MacBook’s built-in camera activated. To switch to your iPhone’s camera, click on the drop-down arrow next to the record button and select your iPhone under the “Camera” section.
- Once you have selected your iPhone’s camera, you will see the live feed from your iPhone on your MacBook’s screen. You can now use your MacBook as a monitor for your iPhone camera.
- To capture photos or videos, simply click on the record button in QuickTime Player. You can also adjust various settings like resolution and audio input from the drop-down menu next to the record button.
- When you’re done, click on the record button again to stop recording.
That’s it! You have successfully used your MacBook as an iPhone camera monitor. Now you can review the photos and videos you captured on your MacBook’s larger screen, allowing for a better visual experience.
Note: While using your MacBook as an iPhone camera monitor, keep in mind that the quality of the live feed might depend on your internet connection and the performance of your MacBook and iPhone.
So go ahead, give it a try, and take your iPhone photography or videography to the next level with the help of your MacBook!
Why Use a MacBook as an iPhone Camera Monitor?
When it comes to photography and videography, having a clear and reliable monitor is essential for capturing the perfect shots. While some cameras come with built-in screens, many professional photographers and videographers prefer using external monitors to ensure a larger, clearer, and more detailed view of their shots.
One option to achieve this is by using a MacBook as an iPhone camera monitor. This can be incredibly useful in various scenarios, such as shooting interviews, documentaries, or even personal projects. Here are a few reasons why using a MacBook as an iPhone camera monitor can greatly enhance your photography and videography experiences:

1. Larger Display
One of the main advantages of using a MacBook as an iPhone camera monitor is the larger display size compared to the iPhone screen. MacBook screens are typically much larger, which allows for a more immersive and detailed view of your shots. This can be especially useful when working in low light situations or when you need to focus on specific details within your frame.
2. Better Color Accuracy
Another advantage of using a MacBook as an iPhone camera monitor is the superior color accuracy. MacBook displays are known for their accurate color reproduction, which is essential when it comes to post-processing your images or videos. Having a more accurate representation of color on your monitor allows you to make more informed decisions regarding color correction, grading, and overall image quality.
In addition to these advantages, using a MacBook as an iPhone camera monitor also provides the convenience of a portable setup, allowing you to easily monitor your shots from different angles. Furthermore, using a MacBook as an iPhone camera monitor eliminates the need for additional external monitors, reducing the overall equipment and cost required for your photography and videography setups.
Overall, using a MacBook as an iPhone camera monitor offers a range of benefits, including a larger display size, better color accuracy, and a portable setup. It can greatly enhance your photography and videography experiences, allowing you to capture and monitor your shots with improved detail and precision.
Requirements for Using a MacBook as an iPhone Camera Monitor
Using your MacBook as an iPhone camera monitor can greatly enhance your photography and videography experience. However, there are a few requirements that you need to fulfill in order to successfully establish this connection between your MacBook and iPhone.
![KLIP 5 in 1 Wireless Lavalier Microphone in Charging Case [ Professional Lav Mic for iPhone, Android, iPad, Camera, MacBook, DSLR Camera, iMac, PC, GoPro ] Podcast/Vlog/Stream/Record](https://m.media-amazon.com/images/I/41up-1cqUOL._SL160_.jpg)
1. Latest Operating Systems
First and foremost, both your MacBook and iPhone need to be running on the latest operating systems. Make sure that your MacBook is updated to macOS Mojave (10.14) or later, and your iPhone is updated to iOS 12 or later.
2. Wired Connection
You will need a lightning to USB cable to connect your iPhone to your MacBook. Make sure that this cable is in good condition and supports data transfer. You can use the cable that came with your iPhone, or purchase a third-party cable that is certified by Apple.
It is recommended to use a USB 3.0 port on your MacBook if available, as it offers faster data transfer speeds compared to USB 2.0.
Additionally, you may need a USB-C to USB adapter if your MacBook only has USB-C ports. This will allow you to connect the lightning to USB cable to your MacBook.
3. Trust the Device
Once you have connected your iPhone to your MacBook using the lightning to USB cable, a prompt will appear on your iPhone asking for trust. Tap “Trust” to establish a secure connection between the devices.

If you have previously established trust between your iPhone and MacBook, this prompt may not appear.
Make sure that you have unlocked your iPhone before connecting it to your MacBook, as a locked iPhone will not establish the connection.
It is also important to note that some applications or features may require additional permissions on your iPhone in order to function properly as a camera monitor.
By following these requirements, you will be able to use your MacBook as an iPhone camera monitor and take your photography and videography to the next level.
Step-by-Step Guide: Using a MacBook as an iPhone Camera Monitor
If you’re looking for a convenient way to monitor your iPhone camera feed on a larger screen, you can use your MacBook as a camera monitor. This can be especially useful for photographers, videographers, or anyone who wants a bigger display for capturing or streaming content. Follow these simple steps to set it up:
Step 1: Install the “Canon Camera Connect” app on your iPhone
First, you need to have the “Canon Camera Connect” app installed on your iPhone. You can download it for free from the App Store. This app allows you to connect your iPhone to various cameras wirelessly.
Step 2: Connect your iPhone and MacBook to the same Wi-Fi network
Make sure both your iPhone and MacBook are connected to the same Wi-Fi network. This is essential for establishing a connection between the two devices.
Step 3: Open the “Canon Camera Connect” app on your iPhone
Launch the “Canon Camera Connect” app on your iPhone, and go to the menu to select “Connect to Camera” or a similar option (this may vary depending on the app version).
Step 4: Connect your iPhone to your camera
Follow the on-screen instructions to connect your iPhone to your camera wirelessly. This usually involves selecting your camera model from the app and confirming the connection on both devices.
Step 5: Open QuickTime Player on your MacBook
On your MacBook, open QuickTime Player from the Applications folder or the Launchpad. Alternatively, you can use other screen mirroring software if you prefer.
Step 6: Connect your iPhone to your MacBook
Connect your iPhone to your MacBook using a USB cable. Make sure the cable is properly connected to both devices.
Step 7: Enable screen mirroring on your MacBook
In QuickTime Player, click on the “File” menu and select “New Movie Recording.” Then, click on the tiny arrow next to the record button and select your iPhone as the camera and microphone source. This will mirror your iPhone screen on your MacBook.
Step 8: Start monitoring your iPhone camera on your MacBook
Once your iPhone screen is mirrored on your MacBook, you can use your MacBook as a camera monitor to preview and capture content. You can also adjust settings, use the camera’s features, and record videos directly from your MacBook.
That’s it! You have successfully set up your MacBook as an iPhone camera monitor. Enjoy the convenience of a bigger screen for monitoring and capturing content with your iPhone.
Tips for a Smooth Experience
Using your MacBook as an iPhone camera monitor can be a convenient way to capture high-quality photos and videos. To ensure a smooth experience, consider the following tips:
1. Upgrade to the Latest macOS
Make sure your MacBook is running the latest version of macOS to ensure compatibility and access to the latest features and improvements.
2. Keep both Devices Updated
Ensure that both your iPhone and MacBook are running the latest iOS and macOS versions respectively. Keeping your devices updated will help prevent any potential compatibility issues.
3. Connect Devices using a Reliable Wi-Fi Network
For a lag-free experience, connect both your iPhone and MacBook to a stable and reliable Wi-Fi network. A strong and consistent connection is essential for real-time monitoring.
4. Adjust iPhone Screen Brightness
Before using your iPhone as a camera and connecting it to your MacBook, adjust your iPhone screen brightness to adequate levels for better visibility. This will help ensure you can properly monitor your shots.
5. Enable Camera Live View
Make sure to enable the “Camera Live View” feature on your iPhone. This will allow your MacBook to receive and display the live feed from your iPhone’s camera.
6. Use Third-Party Apps
Consider using reliable third-party apps designed specifically for using your MacBook as an iPhone camera monitor. These apps often come with additional features and functionalities that can enhance your recording experience.
7. Position the MacBook for Comfort
Find a comfortable position for your MacBook while using it as an iPhone camera monitor. This could be using a MacBook stand, propping it on a stack of books, or any other method that allows you to comfortably view the screen while shooting.
8. Utilize Editing and Sharing Features
After capturing your photos or videos, take advantage of the editing and sharing features available on your MacBook to enhance your content and easily distribute it across various platforms.
By following these tips, you can ensure a smooth experience while using your MacBook as an iPhone camera monitor and capture stunning visuals effortlessly.
Different Methods for Using a MacBook as an iPhone Camera Monitor
If you’re a photographer or videographer who wants to take your iPhone camera skills to the next level, using your MacBook as a camera monitor can be a game-changer. Not only does it give you a larger screen to view and frame your shots, but it also offers more control over settings and the ability to capture higher quality content. In this article, we’ll explore different methods for using your MacBook as an iPhone camera monitor.
Method 1: Using AirPlay
One of the easiest and most straightforward methods is using AirPlay. This method allows you to wirelessly mirror your iPhone screen onto your MacBook. To use this method, make sure both your iPhone and MacBook are connected to the same Wi-Fi network.
- On your MacBook, click on the AirPlay icon in the menu bar and select your iPhone from the list of available devices.
- Your iPhone screen will now be mirrored on your MacBook, acting as a camera monitor.
Method 2: Using a USB Cable
If you prefer a wired connection, you can use a USB cable to connect your iPhone to your MacBook. This method provides a more stable connection and is especially useful when you’re in a location with a weak Wi-Fi signal.
- Connect your iPhone to your MacBook using a USB cable.
- On your iPhone, open the “Trust This Computer” prompt and tap “Trust” to establish a connection.
- On your MacBook, open QuickTime Player.
- In QuickTime Player, go to “File” and select “New Movie Recording”.
- Click on the arrow next to the record button and select your iPhone as the source.
- Your iPhone screen will now be displayed in QuickTime Player, allowing you to use your MacBook as a camera monitor.
Method 3: Using Third-Party Apps
There are also various third-party apps available that allow you to use your MacBook as an iPhone camera monitor. These apps offer additional features and functionality, such as remote control options and live editing tools.
- Download and install a third-party app on both your iPhone and MacBook.
- Follow the app’s instructions to establish a connection between your devices.
- Once connected, open the app on your MacBook to view your iPhone camera feed.
Using your MacBook as an iPhone camera monitor opens up a world of possibilities for enhancing your photography and videography. Whether you choose to use AirPlay, a USB cable, or a third-party app, having a larger screen and more control over your shots can greatly improve your creative process and the quality of your content. Experiment with these different methods and find the one that works best for your needs and preferences.
Limitations of Using a MacBook as an iPhone Camera Monitor
Using a MacBook as an iPhone camera monitor can be a convenient way to get a larger preview of your shots and make adjustments in real-time. However, it’s important to be aware of the limitations that may come with this setup.
1. Connectivity
One of the main limitations is the need for a stable internet connection. In order to use your MacBook as an iPhone camera monitor, both devices need to be connected to the same Wi-Fi network. If the connection is weak or unstable, there may be significant lag or even loss of connection, making the monitoring experience frustrating or unreliable.
2. Compatibility
Not all iPhones are compatible with using a MacBook as a camera monitor. This feature is only available on certain iPhone models with the latest versions of iOS and macOS. Before attempting to connect your iPhone to your MacBook, it’s important to check the compatibility requirements to ensure a successful setup.
In addition, some camera settings and features may not be accessible when using a MacBook as a camera monitor. This can limit your ability to make adjustments on the fly or take advantage of certain shooting modes or effects.
It’s also worth noting that using a MacBook as a camera monitor may drain your iPhone’s battery more quickly, as it will be continuously streaming the live feed to your MacBook over Wi-Fi.
3. Portability
While using a MacBook as a camera monitor can provide a larger screen for better visibility, it also means that you’ll need to carry around an extra device. This can be less convenient and portable compared to using a dedicated monitor or viewing the preview directly on your iPhone’s screen.
Overall, while using a MacBook as an iPhone camera monitor can offer convenience and a larger preview, it’s important to consider the limitations and weigh them against your specific needs and preferences.
FAQ
Can I use my MacBook as a monitor for my iPhone camera?
Yes, you can use your MacBook as a monitor for your iPhone camera. By connecting your iPhone to your MacBook using a USB cable or wirelessly through an app, you can view and control your iPhone’s camera feed directly on your MacBook.
What do I need to connect my iPhone to my MacBook for using it as a camera monitor?
To connect your iPhone to your MacBook for using it as a camera monitor, you will need a USB cable or a wireless connectivity app. If you choose to use a USB cable, make sure it is compatible with both your iPhone and MacBook. If you prefer a wireless connection, download and install a camera app or a screen mirroring app on both devices.


