
Are you tired of letting your digital SLR camera make all the decisions for you? Do you want to take control of your photography and create stunning images? It’s time to learn how to use manual settings on your camera! While it may seem intimidating at first, mastering manual mode will give you the creative freedom to capture images exactly how you envision them.
1. Understand the Exposure Triangle
One of the key concepts you need to grasp when using manual settings is the exposure triangle. This refers to the relationship between three essential settings: aperture, shutter speed, and ISO. Aperture determines the amount of light that enters the camera through the lens, shutter speed controls the duration of the exposure, and ISO measures the camera’s sensitivity to light. By adjusting these settings, you can achieve the desired balance between brightness, sharpness, and noise in your photos.
2. Experiment with Aperture
Aperture, measured in f-stops, controls the depth of field in your images. A smaller aperture (larger f-stop number) creates a greater depth of field, resulting in more of the scene in focus. On the other hand, a larger aperture (smaller f-stop number) creates a shallow depth of field, which can lead to beautiful, blurry backgrounds that make your subject pop. By experimenting with different aperture values, you can achieve stunning effects and add a creative touch to your photographs.

3. Master Shutter Speed
Shutter speed determines the length of time the camera’s sensor is exposed to light. A fast shutter speed freezes motion, making it ideal for capturing action shots or sharp images in low-light conditions. On the other hand, a slow shutter speed allows for longer exposure times, which can create stunning motion blur effects or emphasize the flow of water or clouds. By controlling the shutter speed, you can add drama or capture the essence of movement in your photographs.
4. Balance ISO Sensitivity
ISO sensitivity measures the camera’s ability to capture light. A lower ISO setting (e.g., 100 or 200) is ideal in well-lit conditions, as it produces images with less noise. However, in low-light situations, you may need to increase the ISO to maintain a fast enough shutter speed and avoid blurry photos. Be cautious, though, as higher ISO values can result in more noise or grainy appearance in your images. Finding the right balance of ISO sensitivity based on the available light is crucial for achieving high-quality results.
5. Practice and Experiment
Using manual settings on your digital SLR camera requires practice and experimentation. Don’t be afraid to make mistakes or take photos that don’t turn out as expected. Learning from your failures and trying new techniques will help you grow as a photographer. Take the time to understand how each setting affects your images and be patient with the learning process. With time and practice, you’ll gain confidence and master the art of manual photography, opening up a world of creative possibilities.
Remember, using manual settings on your digital SLR camera is all about taking control and expressing your vision. So don’t hesitate to explore, experiment, and push your creative boundaries!
Understanding digital SLR cameras
Digital SLR cameras, or DSLRs, have become increasingly popular among professional photographers and photography enthusiasts. These cameras offer a wide range of features and settings that allow users to have greater control over their photographs. Understanding the different components and functions of a digital SLR camera is essential for anyone looking to take their photography skills to the next level.
Camera Body
The camera body is the main component of a digital SLR camera. It houses the image sensor, electronic viewfinder, controls, and other essential parts. DSLR bodies come in a variety of sizes and shapes, offering different levels of functionality and durability. It is important to choose a camera body that suits your needs and shooting style.
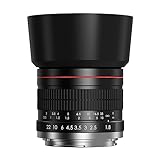
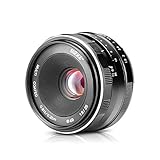
Interchangeable Lenses
One of the biggest advantages of DSLR cameras is the ability to use interchangeable lenses. These lenses allow photographers to achieve different focal lengths, perspectives, and creative effects. Common types of lenses include wide-angle lenses, telephoto lenses, and macro lenses. Understanding how different lenses affect your photographs will greatly enhance your shooting capabilities.

Image Sensor
The image sensor is arguably the most critical component of a DSLR camera. It is responsible for capturing the light and converting it into a digital signal. There are two main types of image sensors used in DSLRs: CCD (Charge-Coupled Device) and CMOS (Complementary Metal-Oxide-Semiconductor). CMOS sensors have become more popular in recent years due to their improved image quality and lower power consumption.
Manual Settings
Digital SLR cameras offer a range of manual settings that allow photographers to have full control over their images. These settings include aperture, shutter speed, ISO, and white balance. Understanding how these settings work and how to adjust them will enable you to achieve the desired exposure, depth of field, and overall image quality.
- Aperture: Determines the amount of light entering the camera through the lens. It also affects the depth of field, with a wider aperture resulting in a shallower depth of field.
- Shutter speed: Controls the amount of time the camera’s shutter is open. Faster shutter speeds freeze motion, while slower shutter speeds create motion blur.
- ISO: Determines the camera’s sensitivity to light. Higher ISO values are useful in low-light situations, but they can introduce more noise or grain in your photos.
- White balance: Adjusts the camera’s interpretation of colors under different lighting conditions. Proper white balance ensures accurate color reproduction in your photographs.
Mastering the manual settings on a DSLR camera takes practice and experimentation. By understanding the basics of how these settings work and how they interact with each other, you will be able to take full control of your photography and unleash your creativity.
Advantages of using manual settings
Using manual settings on a digital SLR camera offers several advantages for photographers who want more control over their images. While automatic modes can be convenient and produce good results in many situations, manual settings allow photographers to fine-tune their images to achieve their desired creative vision.
1. Control over exposure
One of the biggest advantages of using manual settings is having complete control over the exposure of your photos. By manually adjusting the aperture, shutter speed, and ISO, you can achieve the correct exposure for your subject and the desired depth of field. This allows you to manipulate the lighting and create images with more creative effects.
2. Creative freedom
Manual settings give photographers the freedom to experiment and be more creative with their photography. By adjusting the settings, you can create unique and artistic images that reflect your personal style. Whether you want to capture a fast-moving subject with a frozen moment or create a long exposure to capture motion blur, manual settings allow you to achieve these creative effects and more.
3. Consistency in different lighting conditions
Automatic modes can sometimes struggle in challenging lighting conditions, resulting in inconsistent or unsatisfactory results. Using manual settings allows you to have consistent control over exposure, regardless of the lighting conditions. This is particularly useful in situations like low light photography, where the camera’s automatic modes may struggle to produce a well-exposed image.
4. Learning and understanding photography
By using manual settings, you can deepen your understanding of the technical aspects of photography. You’ll have to learn how aperture, shutter speed, and ISO work together to create the desired exposure and effect. This knowledge and experience will not only improve your photography skills but also allow you to troubleshoot and adapt to different shooting situations more effectively.
Overall, using manual settings on a digital SLR camera provides photographers with more control, creative freedom, and the ability to achieve consistent results in different lighting conditions. It also encourages learning and understanding of photography, which can greatly enhance your skills as a photographer.
ISO settings and its effects
ISO is a key parameter in photography that determines the sensitivity of the camera’s image sensor to light. Adjusting the ISO settings can have a significant impact on the quality and appearance of your photos.

Understanding ISO
ISO stands for International Organization for Standardization, and in photography, it refers to the standard for measuring the sensitivity of film or digital camera sensor. A low ISO setting, such as ISO 100, is less sensitive to light and produces images with less noise and higher image quality. On the other hand, a high ISO setting, such as ISO 1600, is more sensitive to light and is ideal for low-light or fast-moving subjects.
Effects of ISO settings
The ISO setting on your digital SLR camera can affect the exposure, noise, and image quality of your photographs.
| ISO setting | Effects |
|---|---|
| Low ISO (e.g., ISO 100) | – Best for well-lit conditions – Less noise – Sharper details – Smoother tonal gradations |
| High ISO (e.g., ISO 1600) | – Ideal for low-light situations – More noise – Reduced image quality – Loss of details |
As you increase the ISO, the sensor becomes more sensitive to light, allowing you to shoot in darker conditions. However, higher ISO settings also increase the visibility of digital noise, which appears as grain or speckles in your photos. It’s important to find the right balance between ISO, aperture, and shutter speed to achieve the desired results.
Understanding how ISO affects your photos is crucial for taking control of your camera’s manual settings. Experimenting with different ISO settings in various lighting conditions will help you develop a better understanding of how it can be used creatively to capture stunning images.
Controlling aperture for better results
Aperture is an important setting in digital SLR cameras that directly affects the depth of field in your photographs. By controlling the aperture, you can achieve different creative effects and enhance the overall quality of your images.

Understanding aperture
Aperture refers to the size of the opening in the lens through which light passes when you take a photo. It is measured in f-stops and is represented by a series of numbers such as f/1.8, f/2.8, f/4, and so on. A smaller f-stop number means a larger aperture, while a larger f-stop number indicates a smaller aperture.
When you use a larger aperture (smaller f-stop number), the lens opening widens, allowing more light to enter the camera. This results in a shallow depth of field, where the subject is in focus while the background is blurred. This effect is commonly used in portrait photography to isolate the subject from the surroundings and create a pleasing bokeh effect.
On the other hand, using a smaller aperture (larger f-stop number) narrows the lens opening, allowing less light to enter the camera. This increases the depth of field, meaning more of the scene will be in focus, from the foreground to the background. Landscape photographers often use a smaller aperture to achieve sharp focus throughout the entire scene.
Controlling aperture
To control the aperture on your digital SLR camera, switch to manual mode or aperture priority mode. In manual mode, you have full control over all settings, including aperture, shutter speed, and ISO. In aperture priority mode, you set the desired aperture, and the camera automatically adjusts the shutter speed to achieve proper exposure.
Once you have selected the appropriate mode, adjust the aperture by rotating the aperture dial or using the control wheel on your camera. Be sure to refer to your camera’s manual for specific instructions on changing the aperture.

Experiment with different apertures to see how they affect the depth of field in your photos. Start by shooting a subject at a wide aperture (small f-stop number) and gradually increase the aperture to see the changes in focus. Take note of the effect on the background and foreground elements.
- Use a large aperture (small f-stop number) for portrait photography to create a shallow depth of field and blur the background.
- Use a small aperture (large f-stop number) for landscape photography to achieve a greater depth of field with sharp focus from foreground to background.
- Adjust the aperture based on the amount of light available. In low-light conditions, a larger aperture will allow more light to enter the camera, while in bright conditions, a smaller aperture will help avoid overexposure.
By understanding and controlling the aperture setting, you have the power to create stunning photos with enhanced depth and creative effects. Experiment with different settings and be sure to practice to develop your skills further.
Managing shutter speed for creative photography
Shutter speed is one of the most important settings to consider when capturing creative photographs with a digital SLR camera. Understanding how to manage shutter speed can greatly enhance your ability to create visually striking images. Here are some tips to help you make the most out of this setting:
1. Freeze or blur motion
Shutter speed determines how long the camera’s sensor is exposed to light. By selecting a faster shutter speed, such as 1/1000th of a second, you can freeze motion and capture sharp, detailed images of fast-moving subjects. This is particularly useful when photographing sports events or wildlife in action.
On the other hand, using a slower shutter speed, like 1/30th of a second, can create motion blur effects. This technique can be used to convey a sense of movement or add a dynamic element to your photos. Experiment with different shutter speeds to achieve the desired effect.
2. Long exposure photography
Long exposure photography involves using slower shutter speeds for an extended period of time, usually several seconds or even minutes. This technique allows you to capture light trails, starry skies, or smooth flowing water. To achieve long exposures, you will need a tripod to keep your camera steady and prevent any unwanted camera shake.
Remember, when using longer shutter speeds, be aware of the amount of light entering the camera. You may need to adjust other settings such as aperture and ISO to properly expose the image.
In conclusion, mastering the art of managing shutter speed on your digital SLR camera is a key component of creative photography. By understanding how different shutter speeds can affect your images, you can selectively freeze or blur motion, as well as create stunning long exposure shots. Don’t be afraid to experiment and push the boundaries of your camera’s capabilities!
Using manual focus for precise shots
When it comes to achieving precise and sharp shots, using manual focus on your digital SLR camera can make all the difference. While autofocus can be convenient in many situations, there are times when it may struggle to accurately capture the subject or scene exactly as you envision it. By using manual focus, you have complete control over what appears sharp in your image.
1. Set your camera to manual focus mode
Start by switching your camera to manual focus mode. This can typically be done by flipping a switch on the lens or setting the focus mode through the camera’s menu. Check your camera’s manual for specific instructions if you’re unsure how to do this.
2. Use the viewfinder or Live View to focus
You can manually focus using either the camera’s viewfinder or the Live View mode if your camera has one. The viewfinder allows you to look through the camera and see what the lens sees, while Live View shows a real-time preview on the camera’s LCD screen.
3. Zoom in and use the focus ring
To achieve precise focus, it’s helpful to zoom in on the subject using the camera controls. Once you’ve zoomed in, adjust the focus ring on your lens to fine-tune the focus. Look for the autofocus confirmation indicator or focus peaking (if available) to help you determine when the subject is in focus.
4. Consider using depth of field preview
Depth of field preview is a feature found on some DSLRs that allows you to see how much of the image will appear sharp when using a specific aperture setting. This can be helpful when you want to control the depth of field in your shot and ensure that the foreground and background are either sharp or blurred as desired.
5. Practice and experiment
The key to becoming proficient in manual focus is practice. Experiment with different techniques and settings to see what works best for your subjects and shooting style. As you gain more experience, you’ll develop a better understanding of when manual focus is necessary and how to achieve your desired results.
Remember, using manual focus can be challenging at first, but with practice, it can become a valuable tool in your photography arsenal. Don’t be afraid to switch back to autofocus if the situation calls for it, but keep in mind that manual focus gives you greater control over your images and can help you capture those truly precise and stunning shots.
Tips for mastering manual settings
Mastering manual settings on your DSLR camera can seem like a daunting task, but with practice and patience, it can greatly enhance your photography skills. Here are some tips to help you on your journey:
1. Understand the exposure triangle:
Aperture, shutter speed, and ISO are the three elements that control the exposure of your image. Learning how these settings work together will give you more control over the final result.
2. Start with aperture:
Aperture controls the depth of field, which affects how much of your image is in focus. Start by setting your aperture to a low value (a small f-number) for a shallow depth of field, and then experiment with higher values for a greater depth of field.
3. Experiment with shutter speed:
Shutter speed controls how long the camera’s sensor is exposed to light. A faster shutter speed freezes motion, while a slower speed creates a motion blur effect. Play around with different shutter speeds to capture the desired effect in your photos.
4. Understand ISO:
ISO determines the camera’s sensitivity to light. A low ISO (such as 100) is ideal for well-lit scenes, while a higher ISO (such as 800 or above) is useful in low light situations. Keep in mind that higher ISO settings can introduce digital noise to your images.
5. Use the camera’s metering mode:
Metering modes determine how the camera measures light. Different modes, such as spot metering or evaluative metering, can help you achieve accurate exposures in various lighting conditions. Experiment with different modes to see which one works best for your desired outcome.
6. Take advantage of the histogram:
The histogram is a visual representation of the distribution of tones in your image. It can help you determine if your image is properly exposed. Aim for a balanced histogram with no extreme spikes on either end.
7. Practice in different lighting conditions:
Mastering manual settings requires time and practice. Experiment with different lighting conditions, such as bright sunlight, golden hour, or nighttime, to become familiar with how your camera behaves in each situation.
8. Don’t be afraid to make mistakes:
Learning manual settings is a learning process, and mistakes will happen along the way. Embrace them as opportunities to grow and learn from your experience. With time and practice, you will become more comfortable and confident in using manual settings.
Remember, mastering manual settings takes time and patience. Don’t be discouraged if your initial attempts don’t turn out as expected. Keep practicing, and soon you’ll be capturing stunning photos with full control over your DSLR camera!
Question-answer:
What are manual settings on a digital SLR camera?
Manual settings on a digital SLR camera allow the user to have full control over various parameters such as aperture, shutter speed, and ISO. This means that the photographer can adjust these settings manually to achieve the desired exposure and creative effects.
Why would I want to use manual settings on my digital SLR camera?
Using manual settings on a digital SLR camera gives you complete control over the exposure and allows you to be more creative with your photography. It allows you to make specific adjustments to the aperture, shutter speed, and ISO, allowing you to achieve the desired effect in your photos.
How do I switch to manual mode on my digital SLR camera?
To switch to manual mode on a digital SLR camera, look for the mode dial on the top of your camera. It will have different mode options like “M” for manual mode. Rotate the dial until the indicator points to the manual mode. Once you are in manual mode, you will have full control over the camera’s settings.
What are the advantages of using manual mode on a digital SLR camera?
There are several advantages of using manual mode on a digital SLR camera. Firstly, it allows you to have complete control over the exposure, which means you can fine-tune the settings to achieve the desired effect. Secondly, it gives you more creative freedom to experiment with different settings. Lastly, using manual mode can help you learn and understand the exposure triangle better.
Are manual settings difficult to use on a digital SLR camera?
Manual settings on a digital SLR camera may seem intimidating at first, but with practice and understanding, they can become second nature. It takes time to learn how to adjust the aperture, shutter speed, and ISO to achieve the desired exposure, but once you grasp the concepts, manual settings can significantly enhance your photography skills.


