
If you are a photography enthusiast or a content creator, you probably understand the importance of having a high-quality web camera for video conferencing, live streaming, or content creation. While most laptops and webcams offer decent quality, nothing beats the image and video quality of a DSLR camera. If you own a Nikon DSLR camera, you can actually use it as a web camera to enhance your online presence and improve the overall quality of your content.
Using a Nikon DSLR as a web camera may sound complicated, but it’s actually quite simple. All you need is a few cables and software to make the connection between your camera and your computer. Once set up, you can enjoy the benefits of using your DSLR as a web camera, such as better image quality, depth of field control, and the ability to use different lenses to achieve various looks.
One of the key requirements for using a Nikon DSLR as a web camera is a compatible cable. You will need a USB cable that can connect your camera to your computer. Make sure to check your camera’s specifications or consult the user manual to determine the type of USB cable required. Additionally, you may need an HDMI cable and an HDMI capture card if you want to use the live view mode on your computer.
Once you have the necessary cables, you will need to install dedicated software on your computer to enable the connection between your Nikon DSLR camera and your computer. Nikon provides its own software, called “Camera Control Pro,” which allows you to control your camera settings and view the live feed on your computer. There are also third-party software options available online that offer similar functionality.
With the right cables and software, you can easily transform your Nikon DSLR camera into a web camera. This opens up a world of possibilities for those who want to take their video conferencing, live streaming, or content creation to the next level. So why settle for average webcam quality when you can harness the power of a DSLR camera to enhance your online presence and captivate your audience?

Preparation and Equipment
Before you can use your Nikon DSLR as a web camera, you will need to gather the necessary equipment and prepare your camera for use. Here is a list of what you will need:
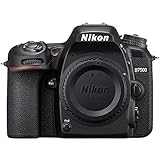
1. Nikon DSLR Camera: Make sure you have a compatible Nikon DSLR camera that supports video mode. Not all Nikon DSLR models have this capability, so it’s important to check your camera’s specifications.
2. USB Cable: You will need a USB cable to connect your Nikon DSLR camera to your computer. Make sure you have the appropriate USB cable for your camera model.
3. Tripod or Camera Mount: To ensure a stable and steady camera setup, it’s recommended to use a tripod or camera mount. This will help prevent any unwanted shaking or movement during your live streaming or video conferencing sessions.
4. Fully Charged Battery: Before using your Nikon DSLR as a web camera, make sure your camera’s battery is fully charged. This will ensure that you have enough power to use the camera for an extended period of time without interruption.

5. Clean Lens and Sensor: It’s important to clean your camera’s lens and sensor before using it as a web camera. Dust or smudges on the lens can affect the image quality, while a dirty sensor can result in spots or marks on your videos.
Once you have all the necessary equipment and have prepared your camera, you can proceed to connect and configure your Nikon DSLR as a web camera.
Selecting the Right Nikon DSLR
When it comes to using a Nikon DSLR as a web camera, choosing the right camera is essential to ensure optimal video quality and performance. Nikon offers a range of DSLR models, each with its own unique features and specifications. Here are some factors to consider when selecting a Nikon DSLR for using as a web camera:
1. Sensor Size
The sensor size of a DSLR camera plays a crucial role in determining the image quality and low-light performance. Nikon offers DSLRs with different sensor sizes, including full-frame and APS-C (crop sensor) options. Full-frame sensors provide better low-light performance and overall image quality, making them ideal for professional video streaming or conference calls.
Tip: If you plan to use your Nikon DSLR mainly for streaming or video calls in well-lit environments, an APS-C sensor camera may be a more budget-friendly option.
2. Resolution and Video Quality
When selecting a Nikon DSLR for use as a web camera, it’s important to consider the resolution and video quality supported by the camera. Look for a camera that offers at least 1080p (Full HD) video resolution, as this will ensure sharp and clear video output.
Tip: If you require higher video quality or plan to stream or record videos in 4K, consider investing in a Nikon DSLR model that supports 4K video recording.
3. Connectivity Options
Check the connectivity options available on the Nikon DSLR camera you intend to use as a web camera. Most modern Nikon DSLRs offer HDMI or USB output, which can be used to connect the camera to your computer for live streaming or video calls.
Note: Ensure that your computer has the necessary ports or adapters to connect the DSLR to maximize its functionality.
By considering factors such as sensor size, resolution, video quality, and connectivity options, you can choose the right Nikon DSLR camera to meet your specific needs for using it as a web camera. Always refer to the camera’s manual or consult Nikon’s official website for detailed specifications and compatibility information.
Connectivity Options
When it comes to using your Nikon DSLR as a web camera, there are various connectivity options available to ensure seamless integration with your computer or other devices. Here are some of the common options:
USB Connection
The most straightforward method is to connect your Nikon DSLR to your computer using a USB cable. This allows you to transfer both image and audio data directly to your computer for live streaming or video conference purposes. Make sure to check if your camera model supports USB connectivity and install the necessary drivers on your computer before establishing the connection.
HDMI Connection
If you prefer a higher-quality video feed, you can connect your Nikon DSLR to your computer using an HDMI cable. This allows you to capture and broadcast high-definition video and audio. However, keep in mind that not all Nikon DSLRs have an HDMI output port, so make sure to check your camera’s specifications before attempting this method.
Additionally, you’ll need an HDMI capture card or an external video capture device that can convert the HDMI signal from your camera into a format that is readable by your computer.
Wireless Connection
If you want to eliminate the hassle of wires, you can connect your Nikon DSLR to your computer wirelessly. Some Nikon DSLR models have built-in Wi-Fi capabilities that allow you to establish a wireless connection with your computer or other devices. You can then use Nikon’s proprietary software or third-party applications to stream the live video feed directly to your preferred video conferencing or streaming platform.

Alternatively, you can use a Wi-Fi adapter or a wireless transmitter to establish a wireless connection between your camera and computer. These devices typically connect to the camera’s USB or HDMI port and transmit the video and audio signals wirelessly to your computer or other devices.
Before attempting a wireless connection, make sure to check if your Nikon DSLR model supports Wi-Fi connectivity and follow the instructions provided by Nikon or the respective third-party device manufacturer to set up the wireless connection.
Remember to prioritize stability and reliability when choosing a connectivity option. Factors such as signal strength, data transfer rates, and compatibility between your camera and computer can greatly affect the quality of the live video feed and overall user experience.
Always consult your camera’s user manual and refer to Nikon’s official website for detailed instructions on how to connect your specific DSLR model as a web camera.
Setting Up Your Nikon DSLR
Using your Nikon DSLR as a web camera requires a few setup steps to ensure compatibility and optimal performance. Follow the steps below to get started:

Step 1: Check Compatibility
Before using your Nikon DSLR as a web camera, make sure it is compatible with this functionality. Check the Nikon website or user manual for information on whether your specific camera model supports webcam usage.
Step 2: Install Software
Install the required software on your computer to establish a connection between your Nikon DSLR and web conferencing applications. Nikon provides specific software for this purpose, which can usually be downloaded from their website.
Step 3: Connect Your Camera
Connect your Nikon DSLR to your computer using a USB cable. Make sure your camera is turned on and set to the appropriate shooting mode. Some models may require the use of the AC adapter to maintain power during longer streaming sessions.
Step 4: Adjust Camera Settings
Open the software you installed in Step 2 and access the camera settings. Set your DSLR to “Live View” mode to enable video output through the USB connection. Adjust any other necessary settings, such as resolution and frame rate, based on your preferred streaming setup.
Step 5: Configure Web Conferencing App
Launch your preferred web conferencing application and access the video settings. Select your Nikon DSLR as the video source or webcam device. Verify that the camera output is displaying correctly by previewing the video feed.
Step 6: Start Streaming
With your camera and web conferencing app properly configured, you are now ready to start streaming. Begin your web conference or online meeting as you would normally, and your Nikon DSLR will act as your high-quality webcam.
Remember to always check for software updates and firmware updates for your Nikon DSLR to ensure optimal performance when using it as a web camera.
Installing the Required Software
Before you can use your Nikon DSLR as a web camera, you need to install the necessary software on your computer. The software allows your computer to recognize and communicate with your camera, enabling it to function as a webcam.
Step 1: Check Compatibility
First, check if your Nikon DSLR camera is compatible with the software required for using it as a webcam. Visit the Nikon website and navigate to the support section. Look for information about your specific camera model and whether it is supported for webcam use.
Step 2: Download and Install Software
Once you have confirmed that your Nikon DSLR camera is compatible, proceed to download the required software from the Nikon website. Look for the section that provides downloads for camera firmware, drivers, or software updates. Locate the appropriate software for your camera model and operating system.
Click on the download link and follow the on-screen instructions to save the software installer file to your computer. After the download is complete, locate the installer file and double-click on it to launch the installation wizard.
Follow the prompts in the installation wizard to install the software on your computer. Make sure to carefully read and accept any license agreements or terms of use that may be presented during the installation process.
Once the installation is complete, restart your computer to ensure that any necessary changes take effect.
Step 3: Configure Camera Settings
After restarting your computer, connect your Nikon DSLR camera to your computer using a USB cable. Depending on your camera model, you may need to set it to “PC” or “Webcam” mode using the camera’s menu or settings options.
Once your camera is connected and in the correct mode, launch the software that you installed in Step 2. The software should automatically recognize your camera and display a live view of what the camera is capturing.
Take some time to explore the software’s settings and options to adjust the camera’s exposure, focus, and other relevant settings. Familiarize yourself with the software’s interface and features to ensure the best performance when using your Nikon DSLR as a web camera.
With the necessary software installed and your camera properly configured, you are now ready to use your Nikon DSLR as a web camera for video calls, live streaming, or any other application that requires a high-quality webcam.
Connecting the Nikon DSLR to Your Computer
To use your Nikon DSLR as a web camera, you will need to connect it to your computer using a USB cable. Here are the steps to connect your Nikon DSLR to your computer:
Step 1: Ensure that your Nikon DSLR is turned off.
Step 2: Locate the USB port on your Nikon DSLR. It is usually located on the side or back of the camera.
Step 3: Take one end of the USB cable and plug it into the USB port on your Nikon DSLR.
Step 4: Take the other end of the USB cable and plug it into a free USB port on your computer.
Step 5: Turn on your Nikon DSLR.
Step 6: Your computer should recognize the Nikon DSLR as a new device and automatically install the necessary drivers.
Step 7: Once the drivers are installed, your Nikon DSLR should be recognized as a webcam by your computer.
Now that your Nikon DSLR is connected to your computer, you can use it as a web camera for video conferencing, live streaming, and other applications that require a webcam. Make sure to adjust the camera settings and focus according to your needs for the best video quality.
Configuring the Nikon DSLR
Before using your Nikon DSLR as a web camera, you will need to configure the camera settings to ensure it is compatible with your computer. Here’s how:
Step 1: Connect your Nikon DSLR to your computer using the USB cable provided.
Step 2: Turn on your camera and set it to the appropriate mode for using it as a webcam. Check the camera’s user manual for specific instructions on how to do this.
Step 3: Once your camera is connected and in the correct mode, navigate to the settings menu on your camera’s LCD screen.
Step 4: Look for the “USB” or “Communication” option in the settings menu. Select this option and choose “PC” or “Webcam” mode.
Step 5: Save the changes and exit the settings menu on your camera.
Step 6: Open your preferred video conferencing or streaming application on your computer.
Step 7: In the application settings, select your Nikon DSLR as the preferred camera device.
Step 8: Adjust any additional settings within the video conferencing or streaming application, such as resolution or frame rate, as desired.
Step 9: You are now ready to use your Nikon DSLR as a web camera! Your DSLR camera will now act as a high-quality webcam for your video conferences or streaming sessions.
Note: Keep in mind that using a DSLR camera as a web camera may require additional software or drivers to be installed on your computer. Check Nikon’s official website for any available updates or support.
Adjusting Camera Settings
Before you can use your Nikon DSLR as a web camera, it’s important to adjust some settings on your camera to ensure optimal performance.
1. Mode Dial
Make sure your camera’s mode dial is set to “M” for Manual mode. This will give you full control over the camera’s settings.
2. Exposure Settings
Adjust the exposure settings to ensure proper lighting. You can manually set the aperture, shutter speed, and ISO to achieve the desired exposure. Experiment with these settings to find the best balance for your webcam setup.
Additionally, you can adjust the white balance settings to ensure accurate colors in your webcam feed. Use the camera’s menu to access the white balance settings and choose the appropriate option based on your lighting conditions.
Keep in mind that depending on your specific Nikon DSLR model, some camera settings may vary. It’s always recommended to consult your camera’s user manual for detailed instructions.
Setting Up Live View Mode
To use your Nikon DSLR as a web camera, you will need to enable the Live View mode on your camera. This mode allows you to see the image from your camera’s sensor in real time on the camera’s LCD screen or computer monitor.
Here are the steps to set up Live View mode:
1. Check Compatibility
Before you begin, make sure your Nikon DSLR model supports Live View mode. Refer to the user manual or check Nikon’s website for compatibility information.
2. Connect Your Camera to Your Computer
Connect your Nikon DSLR to your computer using a compatible USB cable. Ensure that your camera is turned on.
3. Install Nikon Webcam Utility
Download and install the Nikon Webcam Utility software from Nikon’s official website. This software enables your Nikon DSLR to be recognized as a webcam by your computer.
4. Launch the Webcam Utility
After installing the Webcam Utility, launch the software on your computer.
5. Enable Live View Mode
On your Nikon DSLR, navigate to the Live View mode settings. This can usually be found in the menu or a dedicated Live View button on the camera body. Consult your camera’s user manual for specific instructions.
6. Adjust Camera Settings
Once you have enabled Live View mode, adjust the camera settings according to your preferences. You may need to adjust exposure, focus, and other parameters to achieve the desired image quality.
7. Configure Webcam Settings on Your Computer
On your computer, select your Nikon DSLR as the webcam input device in the video conferencing or streaming software you are using. Adjust the resolution, frame rate, and other settings as necessary.
Once you have completed these steps, your Nikon DSLR will be set up as a web camera, and you can use it for video conferencing, live streaming, or other webcam applications.
Using the Nikon DSLR as a Web Camera
If you own a Nikon DSLR camera and are looking to improve the quality of your video calls or live streams, you can use your Nikon DSLR as a webcam. This allows you to take advantage of the superior image quality that DSLR cameras offer compared to built-in web cameras on laptops and webcams. In this article, we will guide you through the process of using your Nikon DSLR as a web camera.
What You Will Need
To use your Nikon DSLR as a web camera, you will need the following:
- A compatible Nikon DSLR camera
- A USB cable that is compatible with your camera
- A computer or laptop
- A video capture software or a streaming platform that supports external cameras
Step 1: Connect Your Camera to Your Computer
Start by connecting your Nikon DSLR camera to your computer using the USB cable. Make sure your camera is turned off before connecting it.
Step 2: Set Your Camera to Live View Mode
Turn on your Nikon DSLR camera and set it to Live View mode. This mode allows you to see the camera’s live feed on your computer screen.
Step 3: Install Video Capture Software
Next, you will need to install video capture software on your computer. There are several options available, such as OBS Studio, XSplit, or SparkoCam. Choose the software that best suits your needs and follow the instructions for installation.
Step 4: Configure the Video Capture Software
Once you have installed the video capture software, open it and configure the settings. Select your Nikon DSLR camera as the video source in the software settings. You may also need to adjust other settings such as resolution, frame rate, and audio input.
Step 5: Start Using Your Nikon DSLR as a Web Camera
After configuring the video capture software, you can start using your Nikon DSLR camera as a web camera. Open your preferred video conferencing or streaming platform and select your Nikon DSLR camera as the video input source. You should now be able to enjoy high-quality video calls or live streams using your Nikon DSLR.
Remember to properly position your camera and adjust the settings for optimal lighting and framing. Additionally, make sure to fully charge your camera or have it connected to a power source during longer usage periods.
Using your Nikon DSLR as a web camera allows you to enhance your online communication or content creation with superior image quality. Follow the steps outlined in this article, and you’ll be able to take full advantage of your Nikon DSLR camera’s capabilities.
Optimizing Webcam Settings
When using your Nikon DSLR as a webcam, it’s important to optimize the settings to ensure the best possible video quality. Here are some tips to help you get the most out of your camera:
1. Choose the Right Resolution
Start by selecting the appropriate resolution for your webcam feed. Higher resolutions will provide sharper images but require more processing power. Experiment with different resolutions to find the balance between quality and performance that works best for you.
2. Adjust the Frame Rate
The frame rate determines how many frames your camera captures per second. Higher frame rates will result in smoother motion, but again, they require more processing power. Consider the purpose of your webcam feed – if you’re streaming video, you may want a higher frame rate, but if you’re using it for video conferences, a lower frame rate may be sufficient.
Keep in mind that higher resolutions and frame rates may generate larger video files, so make sure you have enough storage space available.
3. Set the Exposure
Proper exposure is crucial for a well-lit video. Manually adjust the exposure settings on your camera to ensure that you’re not underexposed (too dark) or overexposed (too bright). Pay attention to the lighting conditions in your environment and make adjustments accordingly.
4. Consider White Balance
The white balance setting helps your camera capture accurate colors. Choose the appropriate white balance option based on the lighting conditions in your environment. If the colors in your video appear unnatural or skewed, adjusting the white balance setting can help correct this.
Experiment with these settings to find the perfect balance for your webcam feed. Remember to check that your camera is fully supported and compatible with the software or app you’re using before you start using it as a webcam.
Adjusting Focus and Exposure
When using your Nikon DSLR as a web camera, it’s important to adjust the focus and exposure settings to ensure you get the best image quality.
To adjust the focus, you can use the autofocus feature of your camera. Simply press halfway down on the shutter button to let the camera autofocus on your subject. If you prefer manual focus, set the focus mode switch on your camera to “M” and use the focus ring on your lens to manually adjust the focus.
Exposure refers to the amount of light that enters the camera sensor. To adjust the exposure, you can use the exposure compensation feature of your camera. This allows you to brighten or darken the image as needed. Press the exposure compensation button and use the command dial to adjust the exposure compensation value. You can also use the metering mode to adjust the exposure settings based on the lighting conditions. Choose between matrix, center-weighted, or spot metering depending on your shooting situation.
Question-answer:
What is a DSLR camera?
A DSLR camera, or digital single-lens reflex camera, is a type of camera that uses a mirror and prism system to allow the photographer to see exactly what will be captured by the image sensor. It offers high image quality, interchangeable lenses, and manual controls.
Can I use my Nikon DSLR as a web camera?
Yes, it is possible to use a Nikon DSLR as a web camera. However, it requires additional software and hardware to achieve this. You will need a USB cable to connect your camera to your computer, and you will also need to download and install the Nikon Webcam Utility software.
What is the Nikon Webcam Utility software?
The Nikon Webcam Utility software is a free software provided by Nikon that allows you to use your Nikon DSLR as a web camera. It converts the camera’s video feed into a format that your computer can recognize, allowing you to use your camera for video conferencing, live streaming, and other webcam-related activities.
Are there any limitations to using a Nikon DSLR as a web camera?
Yes, there are a few limitations to using a Nikon DSLR as a web camera. Firstly, not all Nikon DSLR models are compatible with the Nikon Webcam Utility software. Additionally, you may experience a slight delay in the video feed, as DSLRs are primarily designed for photography and not for real-time video. Lastly, using your DSLR as a web camera for extended periods of time may cause it to overheat, so it’s important to monitor its temperature.


