
When it comes to ensuring the safety and security of your home or office, having a reliable and efficient security camera system is of utmost importance. However, investing in expensive security systems can often be a deterrent for many individuals. But what if there was an affordable and easy-to-use alternative that could provide you with the peace of mind you deserve?
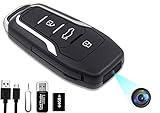
Introducing the Vibe Auto Camera – your ultimate solution for home or office security. With its innovative features and user-friendly interface, the Vibe Auto Camera allows you to convert any smartphone into a fully functioning security camera, without the need for any additional hardware or complicated setup.
So, how does the Vibe Auto Camera work? Simply download the Vibe Auto Camera app onto your smartphone, and you’re ready to go. The app utilizes the latest motion detection technology to monitor any movement or activity within its field of view. In the event of an intrusion or suspicious movement, the Vibe Auto Camera automatically captures images or records videos, which are then stored securely on your device.
The Vibe Auto Camera app also offers real-time monitoring, allowing you to keep an eye on your property from anywhere in the world. Whether you’re at work, on vacation, or simply in another room, you can access the live feed from your smartphone and ensure that everything is safe and secure.
With the Vibe Auto Camera as your go-to security solution, you can enjoy peace of mind knowing that your home or office is protected at all times. Whether you’re looking to safeguard your property from potential intruders or simply want to keep an eye on your loved ones, the Vibe Auto Camera provides you with the reliability, affordability, and ease of use that you need. Don’t compromise on your security – choose Vibe Auto Camera today!

How to Set Up Vibe Auto Camera as Security Camera
Step 1: Connect the Vibe Auto Camera to a power source using the provided cable.
Step 2: Download and install the Vibe Auto Camera app on your smartphone or tablet from the app store.
Step 3: Launch the Vibe Auto Camera app and create a new account or log in to your existing account.
Step 4: Follow the on-screen instructions to connect the Vibe Auto Camera to your smartphone or tablet via Wi-Fi.
Step 5: Once the camera is connected, you can place it in the desired location where you want to monitor as a security camera.

Step 6: In the Vibe Auto Camera app, go to the settings menu and select “Security Camera” mode.
Step 7: Configure the security camera settings, such as motion detection sensitivity, recording options, and push notifications.
Step 8: Test the security camera by walking around the monitored area and checking if the camera detects motion and records video footage.
Step 9: Optionally, you can set up remote access to your Vibe Auto Camera by configuring port forwarding on your router.
Step 10: You can now monitor the live feed from the Vibe Auto Camera on your smartphone or tablet anytime and anywhere using the Vibe Auto Camera app.

By following these steps, you can easily set up the Vibe Auto Camera as a security camera and ensure the safety of your home or office.
Choosing the Right Location
When setting up your Vibe Auto Camera as a security camera, one of the most important factors to consider is choosing the right location. The location of your camera will determine its effectiveness in monitoring the area you want to secure.
Factors to Consider
1. Coverage Area: Assess the area you want to monitor and choose a location that can capture the maximum coverage. Make sure the camera has a wide angle lens or can be adjusted to cover the desired field of view.
2. Height and Angle: Mount the camera at an appropriate height and angle to ensure a clear view of the area. Avoid installing the camera too high or too low, as it may not provide the desired perspective.
3. Accessibility: Ensure that the camera is easily accessible for maintenance and adjustments. It should be easy to reach for cleaning, battery replacement, and changing memory cards, if applicable.

4. Power Source: Consider the proximity of a power source when choosing the camera location. If feasible, select a location near an electrical outlet to avoid long cable runs or the need for additional power supply solutions.
Tips for Placement
- Position the camera at a higher vantage point to deter potential intruders and improve the camera’s viewing angle.
- Mount the camera on a stable surface, such as a wall or ceiling, to prevent unwanted movement or tampering.
- Avoid placing the camera in direct sunlight or areas with extreme weather conditions, as it may affect its performance and durability.
- Place the camera away from potential obstructions, such as trees, bushes, or other objects, that may block the field of view.
By carefully selecting the right location for your Vibe Auto Camera, you can maximize its effectiveness and ensure the security of your desired area.
Installing the Vibe Auto Camera
The process of installing the Vibe Auto Camera as a security camera is simple and straightforward. Just follow these steps:
- Begin by finding a suitable location for the camera. It should have a good view of the area you want to monitor. Ideally, it should be mounted about 8 to 10 feet off the ground for optimum coverage.
- Once you have chosen the location, use a power drill and screws to securely fix the camera mount in place. Make sure it is stable and won’t be easily tampered with.
- Next, connect the Vibe Auto Camera to a power source. It usually comes with a power cable that needs to be plugged into an electrical outlet. Ensure that the power source is reliable and won’t be easily disrupted.
- After connecting the camera to power, you will need to set it up through the Vibe Auto Camera app. Download the app on your smartphone and create an account if you don’t have one already.
- Open the Vibe Auto Camera app and follow the on-screen instructions to connect the camera to your Wi-Fi network. Make sure you have a stable internet connection for this step.
- Once the camera is connected to your Wi-Fi network, you can customize its settings according to your preferences. This includes adjusting motion detection sensitivity, setting up notification alerts, and configuring other security features.
- Finally, test the camera by checking the live stream on your smartphone. Ensure that the camera is capturing the desired area and that the video quality is satisfactory.
By following these steps, you should be able to install the Vibe Auto Camera successfully and use it as a reliable security camera.
Connecting the Camera to Wi-Fi
To use Vibe Auto Camera as a security camera, it is important to connect it to your Wi-Fi network. Follow these steps to connect your camera:
- Make sure your Wi-Fi network is available and working properly.
- Open the Vibe Auto Camera app on your smartphone or tablet.
- Tap on the “Settings” menu located at the bottom of the screen.
- Find and select the “Wi-Fi Settings” option.
- From the list of available networks, select your desired Wi-Fi network.
- Enter the Wi-Fi password if prompted.
- Wait for the camera to connect to your Wi-Fi network. This may take a few moments.
- Once the camera is connected, you will see a confirmation message on the app.
Tips:
- Make sure you are within the range of your Wi-Fi network for a stable connection.
- Ensure that the Wi-Fi password is entered correctly to avoid any connection issues.
- If you are having trouble connecting to Wi-Fi, try restarting both your camera and Wi-Fi router.
Once your Vibe Auto Camera is successfully connected to Wi-Fi, you can now use it as a security camera, view live footage remotely, and access other features through the Vibe Auto Camera app.
Configuring the Camera Settings
Before using the Vibe Auto Camera as a security camera, it is important to configure the camera settings to best suit your needs. The following steps will guide you through the process:
Step 1: Accessing the Camera Menu
To configure the camera settings, start by accessing the camera menu. Open the Vibe Auto Camera app on your device and navigate to the settings section. Look for the camera settings option and tap on it to open the camera menu.
Step 2: Adjusting Camera Parameters
Once you are in the camera menu, you will find a range of parameters that you can adjust to customize your security camera setup:
- Resolution: Choose the desired resolution for your camera. Higher resolutions can provide more detail but may require more storage space.
- Frame Rate: Adjust the frame rate for your camera. Higher frame rates can capture more fluid motion, but may also require more storage space.
- Exposure: Set the exposure level for your camera. This determines the amount of light that the camera captures. Adjust it according to the ambient lighting conditions.
- Sensitivity: Adjust the sensitivity level of the camera. Higher sensitivity can detect even slight movements, but may also lead to more false alarms.
- Field of View: Configure the field of view for your camera. This determines the area that the camera will monitor. Adjust it to cover the desired area.
Take your time to adjust these parameters according to your specific needs and preferences. You may need to experiment with different settings to find the optimal configuration for your security camera system.

Step 3: Saving the Settings
Once you have configured the desired camera settings, make sure to save them before exiting the camera menu. Look for the save or apply button in the menu and tap on it to save the settings.
After saving the settings, your Vibe Auto Camera is ready to be used as a security camera with the customized configuration you have chosen. Ensure that the camera is positioned correctly and connected to a power source or battery to begin monitoring the desired area.
Accessing the Recorded Footage
To access the recorded footage from your Vibe Auto Camera, you can follow these steps:
- First, make sure that your Vibe Auto Camera is connected to a stable internet connection.
- Open the Vibe Auto Camera mobile app on your smartphone or tablet.
- Enter your login credentials to sign in to your Vibe Auto Camera account.
- Once you are logged in, you will be able to see a list of your Vibe Auto Cameras.
- Select the camera that you want to access the recorded footage from.
- After selecting the camera, you will be able to see the live feed from the camera.
- To access the recorded footage, navigate to the recording section in the app.
- In the recording section, you will find a list of all the recorded videos.
- Select the video that you want to view, and it will start playing.
- You can use the playback controls to pause, rewind, or fast-forward the recorded footage.
By following these steps, you will be able to access the recorded footage from your Vibe Auto Camera and review any events or incidents that have been recorded.
Troubleshooting and Tips for Improving Security
If you are experiencing any issues with using your Vibe Auto Camera as a security camera or want to enhance the security measures you have in place, here are some troubleshooting tips and suggestions to improve your security:

1. Check the Camera Placement
Ensure that your Vibe Auto Camera is strategically placed in the area you want to monitor. Make sure it has a clear line of sight to capture the desired coverage. Adjust the camera position if needed to optimize the viewing angle and maximize its effectiveness as a security tool.
2. Verify Power Supply
Check the power supply connected to your Vibe Auto Camera. Ensure that it is securely plugged in and providing consistent power to the camera. In case of any power interruptions, consider using a backup power source, such as an uninterruptible power supply (UPS), to ensure continuous monitoring even during power outages.
3. Confirm Network Connection
Verify the network connection of your Vibe Auto Camera. Make sure it is connected to a reliable and stable network to ensure seamless data transmission and remote access. Troubleshoot any connectivity issues by restarting your router or checking your network settings.
4. Adjust Motion Detection Settings
Review and fine-tune the motion detection settings of your Vibe Auto Camera. Sensitivity levels may need adjustments based on the specific environment and areas of interest. Experiment with different settings to avoid false alarms or missed detection of suspicious activities.
5. Secure the Camera and Footage
It is essential to protect both the Vibe Auto Camera and the recorded footage to maintain the security of your premises. Ensure that the camera is physically secured or mounted in a tamper-proof housing to prevent unauthorized access or tampering. Consider encrypting the stored footage and regularly backing it up to secure storage devices or cloud-based services.

6. Regular Maintenance and Updates
Perform regular maintenance checks on your Vibe Auto Camera. Clean the lens to ensure clear image capture and remove any obstructions that might hinder its functionality. Additionally, keep the camera firmware up to date to benefit from the latest bug fixes and security patches.
| Problem | Solution |
|---|---|
| Camera not functioning | Check power supply and network connection Restart the camera Update firmware |
| Poor image quality | Clean the lens Adjust camera position and focus Check lighting conditions |
| False alarms | Tweak motion detection settings Reduce sensitivity level Ensure camera placement doesn’t cover areas with frequent movement |
| Limited coverage | Add additional cameras strategically Adjust camera position or angle Consider using wide-angle lenses |
| Issues with remote access | Check network settings and firewall Ensure port forwarding is correctly configured Update camera firmware |
By following these troubleshooting tips and implementing the suggestions provided, you can enhance the security capabilities of your Vibe Auto Camera and ensure effective monitoring and protection of your property.
FAQ,
What is Vibe Auto Camera and how can it be used as a security camera?
Vibe Auto Camera is a device that allows you to capture and record videos. It can be used as a security camera by setting it up in a desired location, such as at the entrance of your home or office. The camera can be connected to your smartphone, allowing you to monitor the live feed and receive notifications in case of any suspicious activity.
How do I set up Vibe Auto Camera as a security camera?
To set up Vibe Auto Camera as a security camera, start by positioning it in the area you want to monitor. Make sure it has a clear view of the area and is securely mounted. Download the Vibe Auto Camera app on your smartphone and follow the instructions to connect the camera to your device. Once connected, you can customize the settings, such as motion detection and notifications, to suit your needs.
Can I access the live feed from Vibe Auto Camera remotely?
Yes, you can access the live feed from Vibe Auto Camera remotely through the Vibe Auto Camera app on your smartphone. As long as you have an internet connection, you will be able to view the camera’s feed from anywhere in the world. This is particularly useful if you want to keep an eye on your home or office while you are away.
What features does Vibe Auto Camera offer for security purposes?
Vibe Auto Camera offers several features for security purposes. It has motion detection capabilities, allowing it to automatically start recording when it detects movement. You can also set up notifications to receive alerts on your smartphone when motion is detected. Additionally, the camera has night vision, enabling it to capture clear footage even in low light conditions. It also has a two-way audio feature, allowing you to communicate with anyone near the camera.


