
Vlogging, short for video blogging, has become a popular way to express oneself and share experiences with the world. With the advent of smartphones, vlogging has become more accessible than ever before. Whether you’re a seasoned vlogger or just getting started, the iPhone back camera can be a powerful tool for creating high-quality videos.
The iPhone back camera is known for its superb image quality and advanced features. It allows you to capture detailed footage in various lighting conditions, making it an ideal choice for vlogging. Plus, with the ease of use and portability of an iPhone, you can vlog on the go without the need for additional equipment.
To get started with vlogging using the iPhone back camera, there are a few key tips and tricks to keep in mind. First, make sure to hold the iPhone horizontally to capture a wide-angle view and avoid vertical black bars on the sides of your video. This will give your vlogs a more professional look and feel.
Additionally, experiment with different angles and perspectives to add visual interest to your vlogs. Try holding the iPhone at eye level for a personal and intimate touch, or mount it on a tripod for more stable shots. Don’t be afraid to get creative and think outside the box!
Remember, storytelling is at the heart of vlogging. Embrace your unique personality and share your authentic experiences with your audience. The iPhone back camera can help you capture these moments and bring your vlogs to life. So go ahead, grab your iPhone, and start vlogging with confidence!

Why vlog with iPhone back camera?
Vlogging with an iPhone back camera offers several advantages that make it an excellent choice for creating high-quality content:
| 1. Superior image quality | The iPhone back camera is equipped with advanced technology that captures crisp and vibrant images with excellent clarity. Whether you are recording videos or taking photos, the back camera consistently delivers outstanding image quality. |
| 2. Versatility | The iPhone back camera provides a wide range of settings and features that allow you to adjust your videos and photos according to your specific needs. You can experiment with different options such as exposure, focus, and white balance, giving you creative control over your vlogs. |
| 3. Stability | The back camera is positioned in the center of the iPhone, making it easier to hold the device steadily while vlogging. This stability ensures that your shots remain smooth and steady, resulting in professional-looking videos. |
| 4. Autofocus and stabilization | The iPhone back camera is equipped with autofocus and optical image stabilization, allowing you to capture sharp and clear footage even when you are moving. This feature is particularly beneficial for vloggers who are always on the go. |
| 5. Low-light performance | The iPhone back camera performs exceptionally well in low-light conditions, thanks to its larger aperture and advanced sensors. This allows you to vlog even in dimly lit environments without compromising on the quality of your content. |
In conclusion, vlogging with the iPhone back camera offers a range of benefits including superior image quality, versatility, stability, autofocus and stabilization, and impressive low-light performance. These features make it an ideal choice for vloggers who want to create professional-looking content using their iPhones.
What are the benefits of vlogging with iPhone back camera?
Vlogging has become a popular way for individuals to share their experiences, opinions, and creativity with an audience. With the rise of smartphones, vlogging has become more accessible, allowing anyone with a phone to become a content creator. The iPhone, in particular, offers a convenient and powerful tool for vlogging with its back camera.
1. High-Quality Footage
The iPhone back camera is known for its quality and ability to capture stunning footage. With features such as optical image stabilization and advanced sensors, vlogging with the iPhone back camera ensures crisp, sharp, and professional-looking videos. This can greatly enhance the overall production value of your vlogs and make them more appealing to viewers.
2. Versatility
The iPhone back camera offers a wide range of features and settings that can enhance your vlogging experience. You can adjust exposure, focus, and white balance to ensure that your footage looks exactly how you want it. Additionally, you can shoot in different modes such as slow motion or time-lapse, adding variety and creativity to your vlogs.

Furthermore, the iPhone’s back camera allows you to shoot in different resolutions, including 4K, which provides stunning clarity and detail. This versatility gives you the freedom to experiment with different styles and effects in your vlogs.
3. Convenience
One of the major benefits of vlogging with the iPhone back camera is its convenience. The iPhone is a compact and portable device that you can carry with you everywhere, making it easy to capture footage on-the-go. Whether you’re traveling, attending events, or simply going about your daily life, you can vlog whenever inspiration strikes.
In addition, the iPhone offers a user-friendly interface and a variety of editing apps, allowing you to shoot, edit, and upload your vlogs directly from your device. This eliminates the need for additional equipment and simplifies the vlogging process.
Overall, vlogging with the iPhone back camera offers high-quality footage, versatility, and convenience. It allows you to create professional-looking vlogs with ease and share your content with a global audience. So grab your iPhone and start vlogging today!
Choosing the right iPhone model for vlogging
When it comes to vlogging with your iPhone, choosing the right model can make a big difference in the quality of your videos. Apple offers a range of iPhone models, each with its own unique features and capabilities. Here are a few factors to consider when selecting an iPhone for vlogging.

Camera quality: One of the most important features for vlogging is a high-quality camera. Look for an iPhone model that offers a high-resolution camera with image stabilization and advanced video recording capabilities. This will ensure that your vlogs are clear, sharp, and professional-looking.
Storage capacity: Vlogging often requires a lot of storage space, especially if you record in high-resolution or shoot long videos. Consider an iPhone with ample storage capacity, or opt for a model that allows for expandable storage with a MicroSD card.
Battery life: Vlogging on the go can drain your iPhone’s battery quickly, so it’s essential to choose a model with a long-lasting battery. Look for an iPhone with a battery that can handle extended periods of video recording without running out of power.
Processing power: Editing and rendering videos can be demanding tasks, so having a fast and efficient processor is crucial. Look for an iPhone model with a powerful processor that can handle heavy video editing software.
Connectivity: Being able to easily transfer your vlogs from your iPhone to your computer or upload them directly to social media is important. Consider an iPhone model that offers fast charging and data transfer options, such as USB-C or Thunderbolt.

Additional features: Consider any additional features that may enhance your vlogging experience, such as improved audio quality, a larger display for better video preview, or built-in editing tools.
By considering these factors and choosing an iPhone model that meets your vlogging needs, you can ensure that your videos are of high quality and help you stand out in the crowded vlogging space.
Tips for optimizing iPhone back camera for vlogging
When it comes to vlogging with an iPhone, the back camera can be incredibly useful for capturing high-quality footage. Here are some tips to optimize your iPhone’s back camera for vlogging:
1. Clean the lens
Before you start vlogging, make sure to clean the lens of your iPhone’s back camera. The lens can easily get smudged with fingerprints and dirt, which can affect the quality of your videos. Use a microfiber cloth or lens cleaning solution to gently clean the lens for clear and crisp footage.
2. Adjust exposure and focus
Take advantage of the iPhone’s built-in exposure and focus controls to optimize your vlogging footage. Tap on the screen where you want the camera to focus, and then swipe up or down to adjust the exposure level. This will help ensure that your videos are properly exposed and in focus.
3. Use manual settings
If you’re looking for more control over your vlogging footage, consider using manual settings on your iPhone. Apps like Filmic Pro allow you to adjust settings such as ISO, shutter speed, and white balance. Experimenting with manual settings can help you achieve the desired look and feel for your vlogs.
4. Use a tripod or stabilizer
To avoid shaky footage, use a tripod or stabilizer when vlogging with your iPhone’s back camera. This will help keep your videos steady and professional-looking. There are many affordable tripod and stabilizer options available specifically designed for smartphones.
5. Take advantage of natural light
When vlogging outdoors or in well-lit environments, try to utilize natural light as much as possible. The iPhone’s back camera performs best in good lighting conditions, so positioning yourself in well-lit areas can greatly improve the quality of your vlogging footage.
6. Experiment with different angles and compositions

Don’t be afraid to get creative with your vlogging shots. Experiment with different angles, compositions, and perspectives to make your videos more engaging and visually appealing. Use the iPhone’s back camera to capture unique shots that showcase your personality and style.
With these tips, you’ll be able to optimize your iPhone’s back camera for vlogging, resulting in high-quality and professional-looking footage that will captivate your audience.
Getting the best lighting for vlogging with iPhone back camera
When it comes to vlogging with your iPhone’s back camera, lighting plays a crucial role in enhancing the overall quality of your videos. Here are some tips to help you achieve the best lighting for your vlogs:
1. Natural Lighting
One of the simplest and most effective ways to get great lighting for your vlogs is by utilizing natural light. Try to vlog near a window or in an outdoor setting where you have access to ample sunlight. Position yourself facing the light source to avoid unflattering shadows on your face.
2. Avoid Harsh Shadows
Harsh shadows can be distracting and make your vlogs look unprofessional. To avoid this, use additional lighting sources such as softbox lights or ring lights to balance out any harsh shadows caused by direct sunlight or indoor lighting.

3. Color Temperature
Pay attention to the color temperature of your lighting. Warm lighting can create a cozy and inviting atmosphere, while cool lighting can give a more modern and edgy feel. Experiment with different lighting setups to find the one that suits your vlogging style.
4. Diffusion
If you are using artificial lighting, consider using diffusers to soften the light and create a more natural look. This can be done by attaching a diffusion material or using a softbox to scatter the light.
5. Avoid Overexposure
Try to avoid overexposure in your shots as it can wash out the details and make your vlogs look less professional. Adjust the exposure settings on your iPhone or use a neutral density filter to prevent any loss of detail caused by excessive brightness.
6. Consistency
It’s important to maintain consistency in your lighting setup throughout your vlogs. This will help create a cohesive aesthetic and professional look for your channel. Take note of your lighting setup and replicate it for future vlogs to achieve a consistent look and feel.
By following these tips and experimenting with different lighting setups, you can achieve the best lighting for vlogging with your iPhone’s back camera. Remember, good lighting can greatly enhance the visual appeal of your vlogs and make them more engaging for your audience.
How to stabilize your vlogs using iPhone back camera?
Stabilizing your vlogs is crucial to ensure that your videos come out smooth and professional-looking. While vlogging with the iPhone back camera may seem challenging when it comes to stability, there are a few tips and techniques that can help you achieve better results.
1. Use a tripod: Investing in a good quality tripod can greatly improve the stability of your vlogs. Look for a tripod that is compatible with your iPhone model and offers adjustable height and angles. This will allow you to set up your iPhone in a stable position so that you can record steady shots.
2. Practice proper grip: Holding your iPhone correctly can make a significant difference in the stability of your vlogs. Make sure to use both hands to hold the phone firmly, keeping your elbows close to your body for added support. This will help minimize camera shake and provide smoother footage.
3. Utilize stabilization apps: There are several apps available that can help stabilize your iPhone footage in real-time. These apps use advanced algorithms to reduce camera shake and smooth out the video. Some popular options include Filmic Pro and Hyperlapse.
4. Slow down your movements: When vlogging with the iPhone back camera, it’s important to be mindful of your movements. Slow down your pans, tilts, and transitions to minimize the chances of shaky footage. This will also give your viewers a better chance to focus on what you are showing them.
5. Explore built-in stabilization features: Utilize the built-in stabilization features of your iPhone camera. For example, on newer iPhone models, you can activate the optical image stabilization (OIS) or electronic image stabilization (EIS) settings within the camera app. These features can help reduce camera shake and improve the stability of your vlogs.
6. Consider external stabilizers: If you’re serious about vlogging with your iPhone, you may want to consider investing in external stabilizers such as gimbals or handheld stabilizers. These accessories provide additional stability and control over your shots, resulting in smoother footage.
By implementing these tips and techniques, you can take advantage of the iPhone’s back camera capabilities and stabilize your vlogs for a more professional and visually appealing result.
Essential accessories for vlogging with iPhone back camera
Vlogging with an iPhone back camera can be a great way to capture high-quality videos and share your experiences with the world. However, to enhance the overall vlogging experience and take your videos to the next level, it’s important to invest in some essential accessories. Here are a few accessories that can help improve your vlogging game:
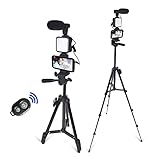
- External Microphone: The built-in microphone on the iPhone may not always capture the best audio quality, especially in noisy environments. Investing in an external microphone can significantly improve the audio in your vlogs, making them more professional and engaging.
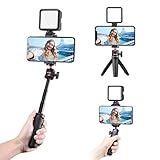
- Tripod: A tripod is an essential accessory for vlogging, as it helps stabilize your shots and prevents shaky footage. Look for a compact and lightweight tripod that is easy to carry around and offers adjustable height options.
- Wide-angle Lens: To capture a wider field of view and add depth to your vlogs, consider investing in a wide-angle lens for your iPhone. A wide-angle lens can help you capture more of the scenery and make your vlogs visually appealing.
- Portable Lighting: Lighting plays a crucial role in the quality of your vlogs. Investing in a portable lighting kit can help you achieve well-lit and evenly-lit shots, regardless of the lighting conditions in your surroundings.
- Gimbal Stabilizer: If you frequently vlog while walking or moving, a gimbal stabilizer can be a game-changer. It helps keep your footage steady and smooth, eliminating any unwanted shakes or vibrations.
- External Battery Pack: Vlogging can quickly drain your iPhone’s battery, especially if you’re shooting for long periods. Carrying an external battery pack can ensure that you never run out of battery power and can continue vlogging without interruptions.
By investing in these essential accessories, you can take full advantage of your iPhone’s back camera and create professional-looking vlogs that will captivate your audience. Remember to choose accessories that are compatible with your iPhone model and suit your specific vlogging needs.

Editing your vlogs shot with iPhone back camera
Once you have finished shooting your vlogs using the iPhone back camera, you may want to edit and enhance them to make them even more appealing to your viewers. Editing is a crucial step in the vlogging process as it allows you to add your personal touch and professional polish to the final product. Luckily, there are several editing apps available for iPhone that can help you achieve the desired results.
1. iMovie: iMovie is a popular video editing app that comes pre-installed on iPhones. It offers a range of editing tools and features such as trimming, splitting, adding transitions, and applying filters. With iMovie, you can easily crop out unwanted footage, add background music, and even overlay text on your vlogs.
2. Adobe Premiere Rush: Adobe Premiere Rush is a professional-grade video editing app that offers a comprehensive set of editing features. It allows you to adjust color, add motion graphics, and apply special effects. You can also synchronize your footage with the beat of a song, making your vlogs more engaging and dynamic.
3. LumaFusion: LumaFusion is a powerful video editing app that offers advanced editing capabilities similar to those found in professional desktop editing software. It provides multiple tracks for audio and video, allowing you to create complex edits and overlays. LumaFusion also supports external storage devices, making it easier to work with large video files.
4. FilmoraGo: FilmoraGo is a user-friendly video editing app that offers a range of editing tools and features. It allows you to trim and merge clips, add music and text, and apply filters and effects. You can also adjust the playback speed of your vlogs, giving them a unique and creative touch.
When choosing an editing app, consider your skill level, desired features, and budget. Experiment with different apps to find the one that best suits your needs and style. Don’t be afraid to get creative and try out different editing techniques to make your vlogs stand out!
Promoting your vlogs filmed with iPhone back camera
After putting in the effort to create engaging and high-quality vlogs using your iPhone’s back camera, it’s important to think about the best ways to promote and share your content with the world. Here are some strategies to help you effectively promote your vlogs:
1. Utilize Social Media Platforms
Social media platforms such as Instagram, Twitter, Facebook, and TikTok are great channels to promote your vlogs. Create accounts dedicated to your vlogging content and regularly share new episodes or clips. Engage with your audience by responding to comments and using relevant hashtags to increase visibility.
2. Collaborate with Other Vloggers
Collaborating with other vloggers in your niche can help expand your reach and attract new viewers. Find vloggers with a similar target audience and propose collaboration ideas such as guest appearances, challenge videos, or even joint projects. This cross-promotion can introduce your content to a whole new audience.
3. Optimize Video Titles and Descriptions
Make sure to optimize your video titles and descriptions to improve search visibility. Use keywords related to your vlog’s topic and include a brief but compelling description that entices viewers to click and watch. Don’t forget to add relevant hashtags in the description to help your videos appear in search results.
Keep in mind that your video’s thumbnail is often the first thing viewers see, so choose an eye-catching and relevant image to increase click-through rates.
4. Engage with Your Audience
Build a loyal community by engaging with your audience. Respond to comments, ask for feedback, and encourage discussions. By fostering a sense of community, you can create a dedicated fan base that eagerly anticipates your future vlogs and shares your content with others.
Additionally, consider hosting live Q&A sessions or creating behind-the-scenes content to give your audience a deeper connection to your vlogs.
Remember, consistency is key. Regularly upload new vlogs and maintain a consistent schedule to keep your audience engaged and coming back for more.
By following these strategies, you can effectively promote your vlogs filmed with iPhone’s back camera, reach a wider audience, and build a successful vlogging channel.
FAQ
Can I vlog with the back camera of my iPhone?
Yes, you can definitely vlog with the back camera of your iPhone. The back camera on newer iPhone models has high-quality resolution and advanced features that make it perfect for vlogging. You can capture clear and detailed footage with the back camera, and it also allows you to use various shooting modes and effects to enhance your vlogs.


