If you own a DSLR camera, you are probably aware of its powerful capabilities and the stunning photos it can produce. However, mastering a DSLR camera can be quite overwhelming, especially for beginners. Learning how to properly use your DSLR camera will not only improve your photography skills but also allow you to capture breathtaking images with ease.
1. Familiarize Yourself with the Camera Controls
The first step to using a DSLR camera effectively is to understand and familiarize yourself with its various controls. Take some time to read the camera’s manual and get to know the functions of each button and dial. This will enable you to quickly adjust settings and capture the perfect shot in various shooting conditions.
Pro tip: Keep practicing and using the camera regularly to gain confidence and become more comfortable with its controls.
2. Understand the Exposure Triangle
The exposure triangle consists of three important parameters: aperture, shutter speed, and ISO. These three settings determine the exposure and overall look of your photographs. Learning how to balance these settings will allow you to control the depth of field, motion blur, and noise in your images.
Pro tip: Experiment with different combinations of aperture, shutter speed, and ISO to understand their impact on your images.
3. Master Manual Mode
While automatic modes can be convenient, manually controlling your camera settings will give you full creative control over your photographs. Switch to manual mode and practice adjusting the aperture, shutter speed, and ISO settings based on the lighting conditions and desired effect for your image.

Pro tip: Use your camera’s histogram to ensure proper exposure in manual mode.
By following these steps and continuously practicing, you will be able to unlock the full potential of your DSLR camera and take stunning, professional-looking photographs. So grab your camera, head outdoors, and start capturing those magical moments!
Mounting your DSLR camera like a pro
Mounting a DSLR camera properly is essential for capturing professional-quality photographs. Whether you are a beginner or an experienced photographer, follow these steps to ensure your camera is securely mounted:
| Step | Description |
|---|---|
| 1 | Attach the lens |
| 2 | Match the lens mount with the camera body mount |
| 3 | Align the white dot or line on the lens and camera body |
| 4 | Rotate the lens clockwise until it locks into place |
| 5 | Secure the lens by tightening the lens release button or screw |
| 6 | Confirm the lens is securely mounted by gently tugging it |
| 7 | Attach the camera to a tripod |
| 8 | Ensure the tripod plate aligns with the camera’s mounting slot |
| 9 | Tighten the tripod plate to secure the camera |
| 10 | Adjust the camera’s position as needed for shooting |
Following these steps will help you mount your DSLR camera like a professional photographer. Always ensure that your equipment is securely attached to prevent any accidents while shooting.
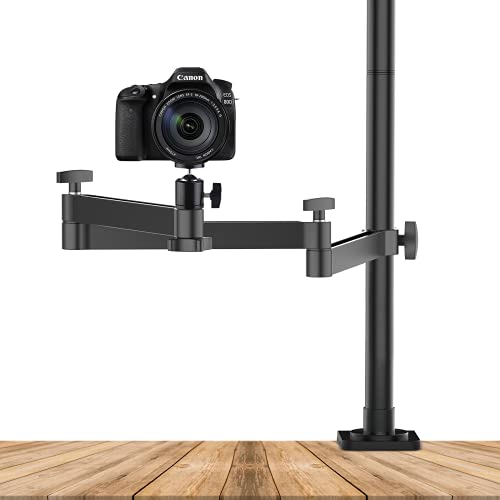
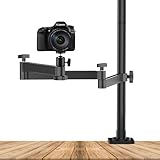
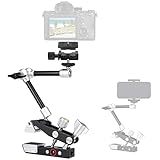
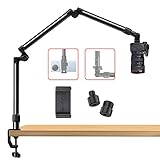
Choosing the right camera mount
When it comes to mounting your DSLR camera, it’s important to choose the right camera mount for your specific needs. The camera mount not only determines how you attach your camera to various accessories, but it also affects the stability and versatility of your setup.
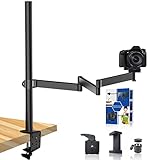
There are different types of camera mounts available on the market, each with its own set of advantages and disadvantages. Here are some key factors to consider when choosing the right camera mount:
- Compatibility: Make sure the camera mount you choose is compatible with your specific DSLR camera model. Different cameras require different mount types, such as Canon EF, Nikon F, Sony E, and Micro Four Thirds.
- Stability: Look for a camera mount that offers a stable and secure connection between your camera and the accessory. A sturdy mount will help prevent any unwanted movements or vibrations during shooting.
- Versatility: Consider the versatility of the camera mount. Some mounts allow you to easily switch between different accessories, such as tripods, monopods, and stabilizers, while others are more limited in terms of compatibility.
- Features: Check if the camera mount has any additional features that could enhance your shooting experience. For example, some mounts have built-in level indicators, quick-release mechanisms, or adjustable locking mechanisms.
- Budget: Set a budget for your camera mount and look for options within that range. Keep in mind that while it’s important to invest in a good quality mount, you don’t necessarily need to go for the most expensive option.
By considering these factors and doing some research, you can choose the right camera mount that suits your specific photography needs. Remember that the camera mount plays a crucial role in ensuring the stability and flexibility of your DSLR camera setup, so it’s worth taking the time to make an informed decision.
Preparing your camera for mounting
Before you can mount your DSLR camera, there are a few important steps you need to take to ensure that everything is set up correctly. Follow the guidelines below to prepare your camera for mounting:
1. Clean the camera body
Start by cleaning the camera body to remove any dust or debris that may interfere with the mounting process. Use a clean, lint-free cloth to wipe down the exterior surfaces of the camera, paying special attention to the lens mount area.
2. Install a fully charged battery
Make sure your camera has a fully charged battery installed to ensure it can operate during the mounting process. Check the battery level indicator on your camera’s display to ensure it has enough power for the duration of your shoot.

3. Attach the lens
Choose the appropriate lens for your project and attach it to the camera body. Align the lens mount with the camera’s lens mount and rotate it clockwise until it locks into place. Ensure that the lens is securely attached to avoid any issues during shooting.
4. Adjust camera settings
Before mounting your camera, double-check and adjust any necessary settings such as ISO, shutter speed, aperture, white balance, and shooting mode. These settings will vary depending on your specific shooting requirements, so refer to your camera’s manual for guidance.
5. Test the camera’s functionality
Perform a quick test of your camera’s functionality by taking a few test shots. Check the image quality, autofocus performance, and other important features to ensure everything is working as expected.
6. Securely mount the camera
Once you have completed all the necessary preparations, securely mount your camera to your desired mounting device. Follow the instructions provided by the manufacturer of your camera mounting system, ensuring that it is tightened properly to prevent any accidental movement or damage during use.
By following these steps, you will be well-prepared to mount your DSLR camera and capture high-quality photographs or videos. Take your time and double-check each step to make sure everything is set up correctly before you begin shooting.

Mounting your camera on a tripod
Using a tripod is essential for achieving stable and sharp photos with your DSLR camera. In this section, we will guide you through the process of mounting your camera on a tripod.
Step 1: Choose a suitable tripod
There are various types of tripods available in the market, so it’s important to choose one that suits your needs. Consider the weight and size of your camera, as well as the type of photography you will be doing. A sturdy tripod with adjustable legs and a stable head will provide the best support for your camera.
Step 2: Attach the mounting plate
Most tripods come with a quick-release mounting plate that attaches to the bottom of your camera. Locate the mounting screw on the plate and align it with the tripod socket on your camera. Use a coin or the provided tightening tool to securely fasten the plate to your camera.
Step 3: Mount your camera on the tripod
Once the mounting plate is securely attached to your camera, place the plate onto the tripod head. Align the screw on the tripod head with the hole on the mounting plate and tighten it to ensure a stable connection. Make sure your camera is securely mounted and doesn’t wobble.
Adjust the tripod legs to your desired height and lock them in place. Use the tripod’s built-in level or a separate bubble level to ensure that the camera is perfectly horizontal or at the desired angle. This is important for achieving straight and well-composed shots.
Now that your camera is securely mounted on the tripod, you can easily adjust the position and angle of your camera to capture the perfect shot. Utilizing a tripod will greatly reduce camera shake and allow you to take long-exposure shots, shoot in low light conditions, or record steady videos.
Remember to take your time and experiment with different tripod positions and angles to find the best composition for your photograph. Happy shooting!
Securing your camera to a strap
Using a camera strap is an important safety measure to ensure the security of your DSLR camera while shooting. Here are some steps to follow to securely fasten your camera to a strap:
1. Choose a strap: Select a camera strap that is compatible with your DSLR camera. There are various types of straps available, such as neck straps, wrist straps, and harness straps. Choose the one that suits your needs and preferences.
2. Attach the strap: Locate the strap lugs on your camera body. These are usually located on the sides, near the top. Attach the strap by threading it through the lug and securing it tightly.
3. Adjust the length: Adjust the length of the strap according to your preference. It should be comfortable and allow you to easily access and use your camera. Ensure that the strap is not too loose or too tight.
4. Secure the strap: Double-check that the strap is securely fastened to your camera. Give it a gentle tug to ensure that it is attached firmly and won’t come off during use.
5. Test the strap: Before heading out to shoot, test the strap by carrying your camera around the house or in a safe environment. Make sure it feels secure and doesn’t cause any discomfort on your shoulder or wrist.
6. Additional security measures: If you want additional security, consider using a camera strap with a quick-release buckle or a strap loop that attaches to your camera’s tripod mount.
Remember, securing your camera to a strap is essential for preventing accidental drops and ensuring the safety of your equipment. By following these steps, you can confidently shoot with your DSLR camera knowing it is securely attached and protected.

Using a Camera Mount for Car Photography
Car photography can be an exciting and challenging genre to master. With the right equipment, you can capture stunning images of vehicles in action. One essential tool for car photography is a camera mount. In this article, we will discuss how to properly use a camera mount for capturing breathtaking shots of cars.
Choosing the Right Camera Mount
When it comes to choosing a camera mount for car photography, stability is key. Look for a mount that is sturdy and can securely hold your camera in place. A suction cup mount is a popular option as it can attach firmly to the exterior of the car. Make sure the mount you choose is compatible with your camera model and lens.
Mounting the Camera
Once you have selected the appropriate camera mount, you can begin the process of attaching it to your vehicle. Start by cleaning the surface where you plan to mount the camera to ensure a strong connection. Remove any dirt, dust, or debris that may hinder the suction cup’s grip.
Next, moisten the suction cup slightly to enhance its adhesion. Press the suction cup firmly onto the chosen surface, ensuring that it is flat and secure. Give it a gentle tug to make sure it is firmly in place before attaching the camera.
Attach your camera to the mount using the appropriate mounting attachment. This may involve screwing the camera onto the mount or utilizing a quick release plate. Make sure your camera is securely attached, as you don’t want it to come loose while shooting.
Adjusting the Camera Position
Now that your camera is mounted, you can adjust its position to capture the desired shots. Make sure the camera is level and facing the right direction. Experiment with different angles, heights, and distances from the subject to find the best composition.
Consider using a remote shutter release or setting a timer to prevent camera shake when capturing the shot. This will help you achieve crisp and clear images without any blurriness.
Checking the Mount Stability
Periodically check the stability of the camera mount throughout your car photography session. Vibrations and movements from the car’s motion can cause the mount to become loose. Take the time to ensure that it remains securely in place and readjust if necessary.
It is also essential to prioritize your safety and the safety of others while using a camera mount for car photography. Always mount your camera in a way that does not obstruct your view and follow traffic regulations.
In conclusion, using a camera mount for car photography can greatly enhance your ability to capture stunning shots of vehicles. By choosing the right mount, following proper mounting techniques, adjusting the camera position, and ensuring mount stability, you can take your car photography to the next level.

Mounting your camera for action shots
When capturing action shots, it is crucial to mount your DSLR camera in a secure and stable manner. This will not only ensure the safety of your camera but also allow you to focus on capturing the moment without worrying about shaky footage.
Here are a few steps to follow when mounting your camera for action shots:
1. Choose the right mounting gear: Look for a sturdy mount that is compatible with your DSLR camera model. There are a variety of mounts available, including chest mounts, helmet mounts, and tripod mounts. Consider the type of action shots you plan to capture and choose the mount that best suits your needs.
2. Ensure a secure attachment: Before heading out to capture action shots, make sure your camera is securely attached to the mount. Double-check all connections and fasteners to ensure they are tightened properly. This will help to prevent any unwanted movement or vibration during your shoot.
3. Positioning the camera: Experiment with different angles and positions to find the optimal position for your camera. Keep in mind that the camera’s field of view should be aligned with the action you want to capture. A wide-angle lens can help capture a wider perspective, but be careful not to include any unwanted distractions in the frame.
4. Test and adjust: Once your camera is mounted, test it out before starting your action-packed adventure. Make sure the camera is correctly positioned and stable. Check the framing and adjust if needed. This will save you time and effort later on and ensure you capture the best possible shots.
5. Safety precautions: Always prioritize your safety and the safety of others when mounting your camera for action shots. Avoid mounting your camera in a way that obstructs your vision or makes you uncomfortable. Also, consider using a safety tether or strap as an additional precaution to protect your camera in case it becomes detached from the mount.
By following these steps, you can confidently mount your DSLR camera for action shots and capture breathtaking moments with precision and stability. Remember, practice makes perfect, so experiment with different mounting techniques to find what works best for you and your photography style.
Tips for mounting your camera on a helmet
Mounting a camera on a helmet is a great way to capture unique and immersive footage from your adventure. Whether you’re skiing, biking, or skydiving, having a camera on your helmet allows you to relive the experience and share it with others. To ensure a secure and steady mount, here are some tips to consider:
|
1. Use a reliable mount: Invest in a high-quality helmet mount specifically designed for cameras. It should provide a secure attachment and minimize vibrations to ensure smooth video recording. |
|
2. Choose the right location: Select a suitable spot on your helmet that offers a clear view of the action without obstructing your vision. Avoid mounting it too high, as it may affect your balance or increase wind drag. |
|
3. Securely fasten the mount: Tightly attach the mount to your helmet using the provided straps or adhesive. Double-check its stability before setting off to ensure it won’t come loose during your activity. |
|
4. Adjust the camera angle: Before starting your adventure, make sure to position the camera at the desired angle and lock it in place. Experiment with different angles to find the one that captures the best perspective. |
|
5. Test the mount: Prior to your activity, do a test run to ensure that the camera mount is secure and the footage is stable. This will give you peace of mind and allow you to make any necessary adjustments. |
|
6. Use a safety leash: In case the mount fails or the camera becomes detached from the helmet, using a safety leash can prevent it from falling and getting lost. Attach it securely to your helmet and camera. |
By following these tips, you can confidently mount your camera on your helmet and capture amazing footage of your adventures. Remember to always prioritize safety and check the mount before each use. Have fun recording your thrilling experiences!
Mounting your camera on a drone for aerial photography
Aerial photography has become increasingly popular, thanks to the advancements in drone technology. By mounting a DSLR camera on a drone, you can capture stunning photos and videos from unique perspectives. However, it is crucial to take proper precautions and follow the correct steps to ensure a safe and successful mounting process.
Choosing the right drone
Before mounting your DSLR camera, it is essential to choose the right drone that can handle the weight and provide stability. Look for a drone specifically designed for aerial photography and videography. Ensure that it has a sturdy gimbal system to keep the camera stable during flight.
Do thorough research and read reviews to find a drone that suits your needs and budget. Consider factors such as flight time, range, and camera compatibility. It is best to opt for a drone that can support a DSLR camera with a heavy lens.
Mounting your DSLR camera
Once you have selected the appropriate drone, it’s time to mount your DSLR camera securely. Follow these steps:
| Step 1: | Turn off both the camera and the drone before the mounting process. |
| Step 2: | Locate the camera mount on your drone. It is usually located underneath the drone’s body. Ensure that the mount is compatible with your DSLR camera. |
| Step 3: | Attach the camera mount securely to the drone using the provided screws or fasteners. Make sure it is tightly secured to prevent any movement during flight. |
| Step 4: | Gently place your DSLR camera onto the mount, aligning it with the screw holes. Use the camera’s tripod mount or any additional mounting brackets for added stability. |
| Step 5: | Once the camera is in position, carefully tighten the screws or fasteners to secure it to the mount. Double-check that it is firmly attached. |
After mounting your DSLR camera, it is essential to test everything before taking it for a full flight. Check the camera’s stability and ensure that all components are working correctly. Calibrate the gimbal if necessary to avoid any jerky movements or vibrations during flight.
Remember to follow all local regulations and guidelines for flying drones equipped with cameras. Always prioritize safety and respect privacy when capturing aerial photographs.
By following these steps, you can mount your DSLR camera on a drone effectively and start capturing breathtaking aerial photographs from a whole new perspective.
Mounting your camera for underwater shots
Capturing stunning underwater photographs requires the proper mounting of your camera. Here are some tips to ensure you have a secure and stable setup for your underwater shots:
1. Choose the right housing
The first step in mounting your camera for underwater shots is to select the appropriate housing. Ensure that the housing is specifically designed for your camera model and is rated for the depth you plan to dive. A good housing will provide protection against water, pressure, and potential damage.
2. Attach the mounting tray
Most underwater housings come with a mounting tray that allows you to attach the camera securely. Make sure to properly align the camera with the tray and tighten any screws or bolts to hold it in place. Check the manufacturer’s instructions for the specific mounting mechanism of your housing.
3. Use a buoyancy device
Underwater photography often requires the use of additional buoyancy devices. These devices help offset the weight of your camera rig and make it easier to handle underwater. Attach the buoyancy device to the housing or tray, ensuring that it is properly secured to prevent accidental detachment during your dive.
4. Consider using strobes or lights
To enhance the colors and details in your underwater shots, consider using strobes or lights. These attachments can be mounted on your camera housing or tray to provide additional lighting. Make sure to position the strobes or lights properly to avoid shadows or hot spots in your photographs.
5. Test and adjust
Before heading into the water, it’s essential to test your camera setup and make any necessary adjustments. Check that all the connections are secure, buttons and controls are accessible, and the camera is properly balanced. Take a few test shots in a controlled environment to ensure everything is working correctly.
By following these steps and taking the time to properly mount your camera, you’ll be well-prepared to capture breathtaking underwater shots. Remember to always prioritize safety and never exceed the depth limits specified by your camera housing manufacturer.
Removing your camera from a mount safely
When it comes to removing your DSLR camera from a mount, it’s important to follow the proper steps to ensure both the safety of your equipment and yourself. Here are some guidelines to help you safely remove your camera:
1. Turn off the power
Before doing anything else, make sure to turn off the power on your camera. This will help avoid any accidental damage or injury during the removal process.
2. Check the locking mechanism
Inspect the locking mechanism on your camera mount and familiarize yourself with how it works. Look for any signs of wear or damage that may affect its functionality. If you notice any issues, it’s best to get it repaired before attempting to remove your camera.
3. Loosen the mount
Use the appropriate tool, such as a spanner or wrench, to loosen the mount. Be sure to turn it counterclockwise to avoid tightening it further. Take care not to exert excessive force, as this can cause damage to the mount or camera.
4. Support the camera
Once the mount is loose, provide support to the camera with your hand while removing it from the mount. This will prevent it from falling or getting damaged during the process.
5. Lift and detach
With one hand supporting the camera, lift it up and slightly away from the mount. Slowly detach the camera from the mount while ensuring a firm grip. Be gentle and avoid any sudden movements that may cause the camera to slip or fall.
6. Inspect and clean
After removing the camera from the mount, carefully inspect both the camera and the mount for any signs of damage or dirt. Clean any dirt or debris using a soft, lint-free cloth or brush. This will help maintain the quality and performance of your equipment.
By following these steps, you can safely remove your DSLR camera from a mount without risking damage to your equipment or yourself.
Question-answer:
What is a DSLR camera?
A DSLR camera, or digital single-lens reflex camera, is a type of camera that uses a mirror and prism system to enable the photographer to see exactly what will be captured in the final image. It offers superior image quality and interchangeable lenses.
How do I mount my DSLR camera on a tripod?
To mount your DSLR camera on a tripod, locate the tripod mount on the bottom of your camera and align it with the tripod head. Place the camera on the tripod head and tighten the mounting plate to secure it. Make sure the camera is stable before releasing your grip.
Why is mounting a DSLR camera on a tripod important?
Mounting a DSLR camera on a tripod is important for several reasons. Firstly, it helps to stabilize the camera and reduce camera shake, resulting in sharper images. Secondly, it allows the photographer to have both hands free for adjusting camera settings and composing the shot. Lastly, using a tripod can enable longer exposure times, which is helpful for capturing low light or night scenes.
What types of lenses can I use with a DSLR camera?
One of the advantages of using a DSLR camera is the ability to interchange lenses. There are various types of lenses available for DSLR cameras, including wide-angle lenses for capturing expansive landscapes, telephoto lenses for distant subjects, macro lenses for close-up photography, and prime lenses with fixed focal lengths for superior image quality. The choice of lens depends on the type of photography you wish to pursue.
How can I clean my DSLR camera?
To clean your DSLR camera, start by using a blower or brush to remove any loose dust or debris from the lens and the camera body. Then, use a clean, lint-free cloth or lens cleaning solution to gently wipe the lens, sensor, and screen. Be careful not to apply too much pressure or use abrasive materials. It is also recommended to have your camera professionally cleaned occasionally to ensure optimal performance.


