The sun eclipse is, without a doubt, a fascinating celestial event that captures the attention of millions of people around the world. The idea of capturing this rare occurrence with your digital camera can be incredibly exciting. However, it is essential to consider the potential impact this event can have on your camera.
When it comes to photographing a sun eclipse, it is crucial to take proper precautions to protect your digital camera. Directly pointing your camera at the sun during an eclipse can cause severe damage to both the lens and the image sensor. The intense light emitted by the sun can heat up the sensor, potentially leading to irreversible damage.
To prevent any harm to your camera, it is recommended to use a solar filter or eclipse glasses specifically designed for photography. These filters help to reduce the amount of light entering the camera, allowing you to capture the beauty of the sun eclipse without risking damage to your equipment.
Additionally, it is crucial to remember that the eclipse phenomenon happens relatively quickly. Therefore, capturing a timelapse of the entire event can be a challenging task. You need to ensure that your camera is set up correctly and that it can withstand prolonged exposure to direct sunlight. This requires the use of proper equipment, such as a sturdy tripod and a remote shutter release, to minimize camera movement and maximize image quality.
While photographing a sun eclipse can be an extraordinary experience, it is crucial to prioritize the safety of your digital camera. Taking the necessary precautions and using appropriate equipment will not only protect your camera but also allow you to capture breathtaking timelapse footage of this unique celestial event.

Choosing the Right Digital Camera for Timelapse Sun Eclipse
When it comes to capturing a timelapse of a sun eclipse, choosing the right digital camera is essential. The camera you use will determine the quality and clarity of the final footage. Here are a few factors to consider when selecting a camera for this purpose:
- Sensor size: Opt for a camera with a larger sensor size, as it allows for better low-light performance and captures more detail during the eclipse.
- Resolution: Higher resolution cameras produce sharper images, so look for one with at least 12 megapixels for capturing the intricate details of the eclipse.
- Dynamic range: A camera with a good dynamic range will capture both the darker and lighter areas of the eclipse without losing too much detail. Look for a camera with a wide dynamic range for better results.
- Manual controls: Having manual controls over settings like aperture, shutter speed, and ISO is crucial for capturing the complex lighting conditions of a sun eclipse. Ensure that the camera you choose offers full manual control.
- Interval shooting feature: Timelapse photography requires a camera with an interval shooting feature. This allows you to set a specific interval between shots, capturing the gradual changes of the eclipse over time.
- Battery life: Consider the battery life of the camera, as a timelapse of a sun eclipse can take several hours to complete. Look for a camera with a long-lasting battery or invest in additional batteries for uninterrupted shooting.
By considering these factors and choosing a camera that meets your requirements, you can ensure that your timelapse of a sun eclipse turns out spectacular. Remember to practice using your camera beforehand and experiment with different settings to get the best results.
Understanding the Different Types of Digital Cameras
Digital cameras have revolutionized the way we capture and share photos. With so many options available on the market today, it can be overwhelming to choose the right one for your needs. In this guide, we will explore the different types of digital cameras available and their unique features.
1. Point-and-Shoot Cameras:
Point-and-shoot cameras are compact, easy-to-use cameras that are perfect for everyday photography. They have fixed lenses and automatic settings, making them ideal for beginners or individuals who want a fuss-free camera experience.

2. DSLR Cameras:
DSLR (Digital Single-Lens Reflex) cameras are more advanced and offer greater control over settings. They have interchangeable lenses and larger image sensors, allowing for higher image quality and better low-light performance. DSLRs are popular among professional photographers and enthusiasts who require versatility and control.
3. Mirrorless Cameras:
Mirrorless cameras are similar to DSLRs but do not have a mirror mechanism. This makes them more compact and lighter. They also have interchangeable lenses and offer advanced features found in DSLRs. Mirrorless cameras are a popular choice for photographers who want high-quality images in a more portable package.
4. Action Cameras:

Action cameras are small and rugged cameras designed for capturing fast-paced activities or extreme sports. They are waterproof, shockproof, and often come with mounts or accessories. Action cameras are popular among adventurers and sports enthusiasts who want to capture their experiences hands-free.
5. Bridge Cameras:
Bridge cameras, also known as superzoom or all-in-one cameras, combine the features of point-and-shoot cameras and DSLRs. They have a fixed lens with a wide zoom range, allowing for versatility in capturing different scenes. Bridge cameras are great for individuals who want a compact camera with the flexibility of a DSLR.
Understanding the different types of digital cameras will help you make an informed decision based on your photography needs and preferences. Whether you are a beginner or a professional, there is a digital camera out there that is perfect for you.
Key Features to Look for in a Camera for Timelapse Photography
Timelapse photography is a popular technique that allows you to capture the passage of time in a compressed video format. Whether you’re capturing a sun eclipse or any other subject matter, having the right camera with the right features is crucial for achieving stunning timelapse results. Here are some key features to look for when selecting a camera for timelapse photography:
1. Intervalometer
An intervalometer is a feature that allows you to set specific intervals between each photo in your timelapse sequence. This feature is essential for creating smooth and consistent timelapse videos. Make sure the camera you choose has a built-in intervalometer or the capability to connect an external intervalometer.
2. Manual Exposure Control
Having manual exposure control is important for timelapse photography as it allows you to maintain consistent exposure throughout your sequence. This is especially important when shooting a sun eclipse, as the lighting conditions can change dramatically. With manual exposure control, you can adjust the settings to ensure each photo is properly exposed.
3. Long Battery Life
Since timelapse photography involves taking multiple photos over an extended period, a camera with a long battery life is essential. Look for a camera that can last several hours on a single charge or consider investing in an external battery pack for extended shooting sessions.
4. High Resolution
For the best results, choose a camera with a high resolution sensor. Higher resolution allows for greater detail in your timelapse videos and provides more flexibility for editing and cropping your footage. A camera with at least 10 megapixels is recommended, but the higher the resolution, the better.
5. Image Stabilization
To achieve smooth and stable timelapse videos, look for a camera with built-in image stabilization. This feature compensates for camera shake, resulting in sharper and more professional-looking footage. If the camera you’re interested in doesn’t have image stabilization, consider using a tripod or a stabilizing rig to minimize camera movement.

By considering these key features when selecting a camera for timelapse photography, you’ll be well-equipped to capture stunning and visually captivating timelapse videos, whether you’re shooting a sun eclipse or any other subject matter.
Optimal Camera Settings for Capturing Sun Eclipses
When photographing a sun eclipse with a digital camera, it is crucial to have the right camera settings in order to capture the event effectively. Here are some optimal camera settings to consider:
1. Shutter Speed
Since a sun eclipse can involve drastic changes in lighting conditions, it is important to set the camera to a fast shutter speed to capture the details of the eclipse. Using a high shutter speed, such as 1/1000th of a second or faster, will help freeze the movement of the sun and prevent any blurriness in the images.
2. Aperture
To properly expose the sun during an eclipse, it is recommended to use a small aperture, such as f/8 or higher. This will help minimize overexposure and preserve the details of the eclipse. Experiment with different aperture values to find the optimal setting for your specific camera and lens combination.
3. ISO
When shooting a sun eclipse, it is best to use a low ISO setting to reduce noise in the images. Start with ISO 100 and increase it if necessary based on the available light. Keep in mind that a higher ISO may introduce more noise, so try to find a balance between capturing enough light and maintaining image quality.

4. White Balance
Setting the correct white balance is essential for capturing accurate colors during a sun eclipse. Use the “Daylight” or “Custom” white balance setting to ensure that the colors are not skewed. Avoid using the “Auto” or “Tungsten” white balance settings, as they may result in unnatural color casts.
5. Focus
Manually focusing your camera is recommended for capturing a sun eclipse. Auto focus may struggle to find the correct focus point due to the unique lighting conditions. Use the Live View mode on your camera’s LCD screen to zoom in on the sun and manually adjust the focus until it appears sharp and detailed.
Remember to practice these camera settings before the actual sun eclipse event to ensure you are comfortable with the adjustments and familiarize yourself with your camera’s capabilities. Happy shooting!
Best Practices for Protecting Your Camera during an Eclipse
An eclipse is a mesmerizing natural phenomenon that many photographers want to capture. However, it is important to take the necessary precautions to protect your digital camera during this event. Here are some best practices to ensure the safety of your camera:
- Use a Solar Filter: Never look directly at the sun with your naked eyes, and the same goes for your camera’s lens. Make sure to use a solar filter designed specifically for photography to capture the eclipse safely.
- Avoid Direct Sunlight: Exposing your camera to direct sunlight for prolonged periods can lead to overheating and damage. Keep your camera in a shaded area whenever possible.
- Use a Tripod: To prevent camera shake and blurriness in your photos, use a sturdy tripod during the eclipse. This will ensure stability and help capture clear, sharp images.
- Monitor Temperature: Extreme temperatures can harm your camera. Avoid leaving it exposed to direct sunlight or in extremely hot or cold environments for an extended period.
- Be Mindful of Condensation: Rapid temperature changes can cause condensation to form on your camera’s lens. Allow your camera to adjust to the surrounding temperature gradually before using it.
- Keep Extra Batteries: Having spare batteries on hand is essential, as cold temperatures drain battery life faster. Make sure to keep them fully charged and easily accessible during the eclipse.
- Opt for Manual Focus: During an eclipse, the contrast between the sun and the background can confuse autofocus systems. Switching to manual focus will ensure your subject is sharp and in focus.
- Protective Gear: You may want to use a lens hood or filter holder to add an extra layer of protection to your camera. Additionally, wear eclipse glasses to protect your eyes while setting up and monitoring your equipment.
- Practice beforehand: Familiarize yourself with your camera settings and practice shooting in similar lighting conditions to the eclipse. This way, you will be prepared and confident when capturing the actual event.
- Handle with Care: Always handle your camera with clean hands and avoid touching the lens directly. Additionally, keep your camera and its accessories in a protective camera bag when not in use.
By following these best practices, you can ensure the safety of your digital camera while capturing stunning photos of a sun eclipse. Happy shooting!

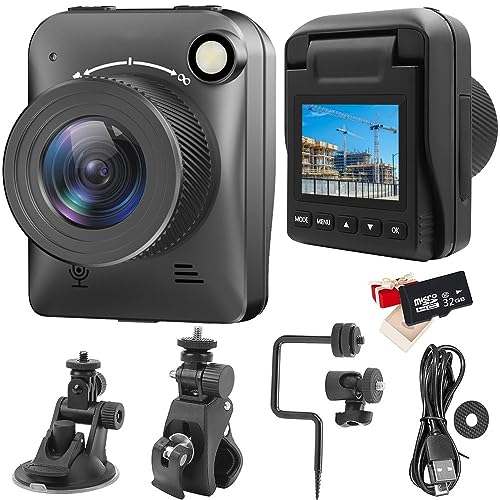
Recommended Camera Accessories for Timelapse Sun Eclipse Photography
When photographing a timelapse sun eclipse, having the right camera accessories can make a significant difference in the quality of your shots. Here are some recommended accessories to enhance your photography experience:
1. Tripod
A sturdy tripod is essential for timelapse photography, providing stability and minimizing camera shake during long exposure shots. Look for a tripod that is lightweight, portable, and adjustable to various angles to capture the perfect composition.
2. Neutral Density (ND) Filters
ND filters are crucial for timelapse photography, especially during a sun eclipse, as they help reduce the amount of light entering the camera. This allows for longer exposures and prevents overexposure of the sun, resulting in more detailed and balanced images.
3. Remote Shutter Release
A remote shutter release allows you to trigger your camera without physically touching it, reducing the risk of camera shake. This is particularly important during a timelapse sun eclipse, where even the slightest movement can affect the quality of your shots. Consider using a wireless remote for added convenience.
4. Solar Filter
Using a solar filter is vital for protecting both your eyes and camera sensor from the intense brightness of the sun during a sun eclipse. This filter ensures that you capture the eclipse safely while maintaining the desired level of detail.
5. Extra Batteries and Memory Cards
Timelapse photography requires a lot of shooting and can quickly drain your camera’s battery. Make sure to carry extra fully charged batteries and ample memory cards, as you don’t want to miss capturing the entire sun eclipse due to insufficient power or storage.
Remember, safety should always be a top priority when photographing a sun eclipse. Use approved solar filters and take precautions to protect your eyes and equipment from potential damage.
By investing in these recommended camera accessories, you can enhance your timelapse sun eclipse photography and capture stunning images that will be cherished for years to come.
Step-by-Step Guide to Setting Up Your Camera for a Timelapse Sun Eclipse
Photographing a timelapse sun eclipse can be an incredible experience. By following these simple steps, you can capture the beauty of this natural phenomenon with your digital camera.
1. Research and Plan:
Before the sun eclipse occurs, do some research to determine the best location and time to capture it. Find out the duration and path of the eclipse, as this will help you plan the duration of your timelapse.
2. Check Your Equipment:
Make sure your digital camera is fully charged and in good working condition. Clean the lens to ensure clear and crisp images. Additionally, use a tripod or stable surface to keep your camera steady throughout the timelapse.
3. Set Up Your Camera:
Choose a spot with an unobstructed view of the sun eclipse. Use manual mode on your camera to have full control over the exposure settings. Set your camera to ISO 100 or lower for optimal image quality.
4. Choose the Right Lens:
Select a lens with the appropriate focal length for your desired composition. A telephoto lens can help you capture close-up details of the eclipse, while a wide-angle lens can capture the surrounding scenery.
5. Use a Solar Filter:
Never look directly at the sun or point your camera directly at it without a solar filter. Attach a solar filter to your lens to protect your camera and your eyes from the sun’s intense rays. This will allow you to capture the eclipse safely.
6. Configure the Settings:
Set your camera to a high shutter speed (around 1/1000 second) to freeze the motion of the sun and avoid overexposure. Adjust the aperture and ISO settings as needed to achieve the desired exposure.
7. Set the Interval:
Determine the interval at which you want your camera to take photos. This will depend on the duration of the eclipse and the desired length of your timelapse video. Keep in mind that longer intervals will result in a faster timelapse.
8. Start Shooting:
Once everything is set up, start the timelapse by pressing the shutter release button or using an intervalometer. Let your camera capture a sequence of images throughout the sun eclipse.
9. Monitor and Adjust:
While your camera is capturing the timelapse, periodically check the images to ensure they are turning out as expected. Make any necessary adjustments to the camera settings if needed.
10. Post-Processing:
After the eclipse is over and you have finished shooting, transfer the images to your computer for post-processing. Use software like Adobe Lightroom or LRTimelapse to create your timelapse video by combining and enhancing the images.
Remember, safety should always be your top priority when photographing a sun eclipse. Never look directly at the sun without proper protection, and use caution when setting up your equipment.
Tips for Post-Processing Your Timelapse Sun Eclipse Footage
Once you have captured your timelapse footage of a sun eclipse with your digital camera, the next step is to process the footage to enhance its visual impact. Here are some tips to help you with the post-processing stage:
| Tip | Description |
|---|---|
| 1 | Import the footage into a video editing software |
| 2 | Adjust the exposure settings to balance the light and dark areas |
| 3 | Apply color correction to enhance the colors and contrast |
| 4 | Consider adding a gradual fade-in and fade-out effect for smooth transitions |
| 5 | Experiment with different effects like vignette or lens flare to add drama |
| 6 | Speed up or slow down the footage to create a desired pace |
| 7 | Add a soundtrack or ambient sound to complement the visuals |
| 8 | Export the final video in a high-quality format for sharing or further editing |
Remember, post-processing is a creative process, so feel free to experiment with different techniques and styles to achieve the desired result for your timelapse sun eclipse footage. With practice and patience, you can create stunning visuals that capture the beauty and awe of this rare celestial event.
Exploring Advanced Techniques for Timelapse Sun Eclipse Photography
Timelapse photography allows photographers to capture the gradual changes in the environment over an extended period of time. When it comes to capturing a sun eclipse, timelapse photography can be a captivating way to document the phenomenon and to observe its progression. In this article, we will explore advanced techniques that can enhance your timelapse sun eclipse photography skills.
1. Use a solar filter
To safely capture a sun eclipse with your digital camera, it is imperative to use a solar filter. A solar filter helps protect your camera’s sensor from the intense sunlight and prevents damage. It also allows you to capture the details and contrast of the eclipse without overexposure.
2. Optimal camera settings
When setting up your digital camera for a sun eclipse timelapse, there are several key settings to consider:
| Aperture: | Set your aperture to a small value (higher f-number) to ensure a deeper depth of field and sharper images. |
| ISO: | Use a low ISO setting to minimize noise and capture cleaner images. |
| Shutter speed: | Experiment with longer shutter speeds to capture the gradual changes in the sun’s position during the eclipse. |
3. Camera stability
For timelapse photography, it is crucial to keep your camera stable throughout the entire shooting process. Use a tripod or any stable surface to minimize camera movement and ensure sharp images. Consider using a remote shutter release or a timer function to further reduce camera shake.
4. Interval timing
Deciding on the interval timing for your timelapse is essential for capturing the desired effect. During a sun eclipse, the changes in the sun’s position and the lighting conditions can be dramatic. Experiment with different intervals, ranging from seconds to minutes, to capture the progression effectively.
5. Post-processing
Once you have captured your sun eclipse timelapse, use post-processing software to enhance the final result. Adjust the white balance, exposure, and contrast to bring out the details of the sun and the eclipse. Consider creating a video from your timelapse images to showcase the eclipse’s evolution.
By utilizing these advanced techniques for timelapse sun eclipse photography, you can create stunning visual narratives of this awe-inspiring natural phenomenon. Remember to prioritize safety and protect your eyes and equipment during the process.
Question-answer:
Will taking a timelapse of a sun eclipse damage my digital camera?
Taking a timelapse of a sun eclipse can potentially damage your digital camera if you do not have the proper filters in place. The intense brightness of the sun during an eclipse can harm the camera’s sensor. Make sure to use a solar filter specifically designed for protecting your camera during solar events.
What kind of filters do I need to use for a timelapse of a sun eclipse?
For a timelapse of a sun eclipse, you should use a solar filter that is designed to block out most of the sun’s intense light and heat. Make sure to get a filter that is suitable for your specific camera model and lens. Using the wrong filter or no filter at all can potentially damage your camera’s sensor.


